Monday, December 31, 2007

Picnic Session

I am so happy! Both my Royal Prince Charming and I will be going on a Picnic session tomorrow! Yes, the first day of 2008 ;) Surprisingly, it is also our 6 months Wedding Anniversary :)

Am currently cracking my brains on what to bring for our picinic. Royal Prince Charming has 千交代 and 萬交代 not to bring too much food. I've always got the tendency to overcook, as in cook too much! He's always the one clearing up the leftovers and everyone one seems to be saying that he has put on weight after getting married. Now, he's pointing at me for his weight gain. Well, I can't control myself sometimes :P

Anyway, I guessed I should be bringing:

  • Mini Chicken Pies X 2
  • Mini Onigiris X 2
  • Sausage Cocktails X 2
  • Mini Tuna Sandwiches X 4
  • Potato Salad X 2
  • Plain water (1.5 litres) X 1

Wish me luck in getting them prepared tonight! Ciaos!

Sweet Pear Tart


Makes 2 (9cm Mini Tart Pastry)

IngredientsAmounts
Bread Flour 260g
Butter (Soften) 160g
Icing Sugar 20g
Water 50g
Salt2g

Caramel Pear Filling

IngredientsAmounts
Pear
1 Big one
Sugar
1 Cup
Water
3 Tbsp

Pie Pastry :
  1. Combine all the ingredients for the pie pastry together.

  2. Blend into a smooth and buttery mixture and ensure that all ingredients are combined nicely.

  3. Bring to chill for at least 1 hr.

Caramel Pear filling:

  1. Slice the pear up into small pieces.

  2. Place the sliced pears into a pan, add in sugar and water. Blend well.

  3. On medium heat, simmer the mixture till pear is soften.

  4. When mixture starts boiling, lower the heat to small and allow the pear to cook further so that it will be very soft.

  5. Leave to cool.
* As pear contains an amount of fluid, there will be more liquid when cooking. Thus, you may need to scoop up the excess liquid.*


Sweet Pear Tart:

  1. Roll out the chilled pastry dough.

  2. Flatten into a thin round shape. Ensure that the dough shape is bigger than your pie pan.

  3. Place the pastry over the pie pan and cut out the excess dough.

  4. Poke holes onto the bottom of the pie pastry using fork.

  5. Add the caramelized pear filling into the pie pastry.

  6. Cover the pie with another rolled pie pastry.

  7. Bring to bake at 180 degree Celsius for 45 mins.


The pears were another complimentary "gift" from my Mother in law. They were with us for quite sometime and both me and my Royal Prince Charming hardly got the time to cut them up and swallow them down our stomach. Well, lazy bug is working up on us as usual.

Anyway, I realised that the pears were turning soft, a sign that tell me to act before they starts rotting in my fridge. Was thinking of doing a fruit salad but my Royal Prince Charming doesn't like plain yogurt because he finds that they are too sour for his liking. Thus, I decided to made them into tarts. Noticed that the shape of my pear tart looks kind of weird? That's because I did not roll the pastry big enough to cover the pan thus, I had to wrap them up instead ;)

The caramelized pear filling was done by intuition and it was miracle that it's my type of tea. I like it sweet without the taste of any spice. The tart was crispy even after it became cold. My Royal Prince Charming like the tart and asked if I could make them for our Picnic session on Monday. That's a sure do :)

Saturday, December 29, 2007

Change of Blog address

Dear readers,

My Royal Prince Charming recently had his former name changed. Thus, with effect from 27th December 2007, I offically pronounced to the world that I will be known as Mrs Kwok instead of Mrs Kuo.

My blog address will be updated accordingly. Therefore, please note that my new blog will be stationed at http://thekwoks-viewfinder.blogspot.com .


XOXO,
Happy Mrs Kwok

Thursday, December 27, 2007

Mee Goreng


Makes 6 servings

IngredientsAmounts
Hokkien Mee500g
Oil50ml
Tau Kuar (cubed)1 pieces
Diced onions1
Ketchup6 Tbsp
Chilli Sauce6 Tbsp
Chinchalok2 Tbsp
Mixed vegetables1 1/2 full cup
Bean sprouts1 cup

* Remember to wash hokkien mee before cooking for better hygiene and less greasiness*

  1. Heat up the oil in a frying wok on medium heat. Bring the diced onions to cook till fragrant.
    Add in the cubed tau kuar. (I did not deep fried the Tau kuar for a healthier option)

  2. Stir in hokkien mee and blend well. You may add in some water/Chicken stock to prevent the noodles from sticking to the wok if you are using a non-stick one like mine.

  3. Stir in the mixed vegetables and make sure it is well combined with the noodles.

  4. Add in the ketchup, chilli sauce and Chinchalok. Stir well and simmer for 2 mins.

  5. Lastly, add in the bean sprouts and stir well. Simmer for another 1 min and it is ready to be serve.


This is the Mee goreng that I whipped up for my Family Christmas Dinner. It is in fact my first attempt trying on it and I am relieved that it tasted good and my family members love it :)

I did this recipe by intuition as in, I try to figure out how Mee goreng should be done. I can't say its 100% similar to the one we get from our Malay friends but I can say its resemble 80% like the one we get from the local Zi Char stall.

My cousins commented that it was nicely done up and they really like it. I added in Chinchalok because my family members are big fans of spicy food and so do I! I can't live without chilli ;)

For those who are not sure of what Chinchalok is, it is acutally a very delicious sauce that's slightly saltish and pungent. I don't really know how to describe it but I was introduced to this sauce long long way back during my primary school days. My god mum love to make Chinchalok herself and we always eat that with BBQ food and mee hoon.

Both my parents and I really adore Chinchalok to core. However, it is not recommended for freuqent consumption because of the prawn paste. Not very healthy I think? Anyway, you can get Chinchalok almost anywhere in Singapore. There are a few brands but the one that I really like is Taho. Oh, by the way, it is very cheap, $1.50 per bottle only. Try it someday!

*****************************************************
Updates: With effect from 27th November 2007, please address me as Happy Mrs Kwok. No longer Mrs Kuo anymore. Oh nono, don't get the wrong idea! My Royal Prince Charming had his name changed. I still have the same and doting husband. LOL. I wil get my banners updated to reflect "Happy Mrs Kwok" asap.

Christmas Family Dinner 2007

Christmas has finally arrived and the long awaited Christmas Dinner for my family has come! I was truly excited about this. It's been weeks since we had a big family gathering. I really miss my Grandma lots. I guess she miss me too because she look so cheerpy on that day ;)

Anyway, it was not only a busy day but also a chaotic day. Not the food I mean, its the kids! Firstly, my 1 yr old niece, Deon has already learnt to walk, oh nono more advance, she is running. My 3 yr old nephew, Burvin can speak clearer sentences with very cute expressions :) I didn't know that not seeing them for only 2 weeks can create such big impacts. Kids grow fast I cay say. My niece was running all over my house and grabbing every single thing she see and trying to throw them. My nephew is busy talking to people and yelling with joy. My sister and brother in law came along with Charlotte my new born niece~ To prevent the 2 kids from disturbing my Charlotte baby, I rushed my sister to carry Charlotte to my room. It's peaceful and breezing in there :D

I wanna thank my Dear Mummy for helping me with the food too! Without her help, I think my guests might starve. LOL. Dear Mummy prepared Fried Wings, Chicken Curry and Fried rice, my all times favourties! On the other hand, I prepared Mee goreng, Cocktail sausages, Fried Spring Rolls, Honey Baked ham. One of my cousin is a vegetarian thus my 二嬸 also his mum helped to cooked some vegetarian Mee siam and gyozas. I tell you, the gyozas tasted like the non-vegetarian kind! Awesome!

Dear Daddy also helped to move a table and some chairs over, as my dinning table is too small to hold all the food and I don't have sufficient chairs for the guests. Daddy brought red wines over too! Daddy and Mummy, you two are the greatest! I love both of you so so so much!

The party ended late and both me and my Prince Charming was dead beat after that. We were fortunate that my family helped to clean up the whole area. If not for their help, I think we may not get to sleep :P

Anyway, here's some random pics we took on the Christmas Family dinner. Enjoy!


Messy me cutting the brownies up for serving


The Mee goreng. All the guests love it!


The sausages and Spring rolls.
Took me quite some time to get both of them done.


My Ninjia Turtle Nephew, Burvin


My 大伯 and niece, Deon


The siblings playing with MY CHRISTMAS TREE!


Oreo, my 大伯's puppy

Thats all folks! It's really a long long post~

Thursday, December 20, 2007

Red Bean Mochi


Makes 12 Mochi

IngredientsAmounts
Glutinous Flour300g
Warm water200g
Sugar100g
Corn FlourA handful
Salad Oil1 Tbsp

Filling: Red bean paste
(I cooked the paste myself, you may get this in Phoon huat if you don't feel like spending time cooking it)

  1. Combine the flour, water and sugar together. Mix into a dough and knead till it is smooth and non-sticky.

  2. Bring the dough to steam. Chopsticks will come out with a transparent mixture when the dough is ready.

  3. Bring out the dough and put it a bowl grease with oil. Knead the dough till it becomes soft and spongy. Remember to use a glove when doing so as the dough is very hot.

  4. Cut the dough into small pieces and flatten it. Fill the center of the flattened dough with red bean paste and wrap it up.

  5. Coat the ready mochi with corn flour.

Red Bean Paste

You will need:

  • Red beans (1 packet)
  • Sugar (1 cup)
  1. Cook the red beans in a pot water till the beans become very soft. It took me half an hr to get it really soft.

  2. Drain any excess water from the red bean and combine the sugar. Stir constantly to make sure that the sugar get eaten into the red bean mixture.

  3. Leave to cook and fride it for usage.


I was watching one program from SCV a couple of days ago and they were teaching how to make Mochi at home. The steps looked simple thus I decided to try my hand on it since its not a working day.

I can say that kneading the dough is a tedious job because glutinous flour has a very sticky texture and it makes it very hard to knead when combine with water. Anyway, the mochi tasted good except that I need to improve my wrapping skills!

Carrot Loaf


Makes 750g Loaf

IngredientsAmounts
Bread flour450g
Butter1 1/2 Tbsp
Sugar2 Tbsp
Salt1 tsp
Diced Carrots56g
Water250ml
Instant Dry Yeast1 Tsp

  1. Gather all the ingredients except diced carrots into the Bread Machine.

  2. Select "Basic" program and Loaf size of 750g. Proceed to press "Start".

  3. When the doughing process has finished, there will be a beeping sound. Open up the lid and add in the dice carrots.

  4. Allow the machine to function. The bread machine will continue to proof and bake the loaf.
    The whole process should take around 3 hours.


I got a surprise when I got back home last night. As my Royal Prince Charming was out with his friends, I went for my Yoga session as usual. When I got home and stepped into the kitchen, I saw this bulky box sitting on my table top.

Initially, I thought that my Prince Charming had brought out the Deep Fryer Machine which we just bought last week and so I was curious why he actually got it out from the storeroom. I walked forward and realised its not my Deep Fryer. IT'S A BREAD MACHINE!

Very shocked, I was really shocked! I started to look around and saw this note that was written by my Prince Charming. It goes: "

Dear,

Surprise! Early Christmas Present for you!
Hope you like it! Merry Christmas~!

Love,
Your Prince Charming

I was so touched! I called my Prince Charming immediately and he confessed that he run all the way to Carrefour and got it back home before I reached home so that he could give me a good surprise. I love you my darling :)

Thus, I couldn't wait to use my newly bought Bread Machine. Decided to try out with Carrot loaf because it is very easy and I have tonnes of carrots at home and there is a desire need to clear them before they starts to rot. The bread came out nice at 2am. I was truly tired after that.

I sliced the bread up for our breakfast today and oh my, the bread is gorgeously nice and fluffy. We ate almost half a loaf! It's such a wonderful thing to own a Bread machine! It's so hassle free!

Tuesday, December 18, 2007

Freshly from Taiwan

I am on my diet plan and seriously, my control over junk foods and oily food were rather well managed since the day I started. I did not have a slice of chips, no soft drinks and no fast food for the past 1 week. I know that ther is a need to discipline myself with the kind of food I'm stuffing into my mouth everyday. Everything worked so well until when I saw these:


They nearly spoilt my whole plan! I was drooling with saliva and struggling with the thoughts of "transmiting" them down my stomach. Gosh! Why on earth does this happens to me when I AM ON DIET? I was really yearning to eat them :(

My evil Royal Prince Charming ate them right in front of my eyes! He even commented that they tasted HEAVENLY! Oh my, oh my! How I wish I could just close my eyes and snip them down my throat. Awwww... UNFAIR!

Just in case you are wondering what they are, the black looking dough is actually a Chocolate flavoured Puff with milky filling while the other is the well known Lao Po Bing. My Mother-in-Law sent them over to us from Taiwan. She rushed us to finished up the puffs because she only got them in the afternoon and had them sent over at night so the puffs were still consider fresh.
Anyway, I DID not get to taste them so verdict comes from my Evil Prince Charming. He says that the milky filling taste even better than the ones at Beard Papa. By the way, it's an interesting sight that the puffs comes with a bottle of filling and so you need to squeeze the filling into the puffs by yourself. We never get to do such things in Singapore! The packaging looked so kawaii too! I bet they gonna win over the hearts of many kids. Take a look!


Ps: I know the packaging don't look very clear in this pic.

Sunday, December 16, 2007

Kisses for Prince Charming

I want to thank my Royal Prince Charming for editing my blog template! It's a disastrous progress I can say. It took him almost the whole night trying to figure out what happen to my banner. My banner was flipped from its original size! It' look so small now :(

I guess blogger is encountering some bugs. It took me the whole day yesterday to figure what happen too. Couldn't really think of any problem so my Prince Charming took this mission over! LOL. He is wayyyyyyyyyy more knowledgeable in programming than me ! He's an IT Analyst and that's what he does everyday in office! :P

Anyway, I heart my new blog template because there's a slight change to the icons and graphics. All credits goes to Prince Charming! I LOVE YOU DARLING~ Muacks! *Shy*

Saturday, December 15, 2007

Christmas Log cake


Makes 1 Swiss roll

IngredientsAmounts
Egg whites4
Egg yolks4
Sugar1 cup
Cake flour1 cup
Baking powder1 tsp
Cold water4 tbsp

Inner Cream: Whipping cream and diced peaches

Outer glaze: Melted semi-sweet chocolate and Whipping cream
( The above are based on personal estimation)

  1. In a bowl, whisk the egg yolks and sugar together. When the combination turns pale yellow, add in the cold water.

  2. Sift the flour and baking powder. Add the flour mixture to the batter and blend well.

  3. In another bowl, whisk up the egg whites till stiff. Add the egg whites to the cake batter and fold in gently.

  4. Pour the ready batter onto a flat pan layered with grease-proof paper and bring to bake at 160 degree Celsius for 20 mins or when stick comes out dry when poked.

  5. Allow the cake to cool before you starts to roll up. Spread the cake with whipping cream and topped with diced peachers. With both hands, roll up the cake carefully.

  6. Apply the chocolate glaze onto the whole cake. Using a fork, line the glaze.

  7. Chill the cake in the fridge for at least 30 mins before serving.


Well, actutally it wasn't suppose to be a log cake in the first place. I was thinking of making a Peach swiss roll but because the cake cracked, I had no choice but to cover the "Damages" with chocolate glaze.

I only have myself to blame for cracking the cake! Firstly, the cake base wasn't suitable to be rolled up because it's very thick but because I'm so lazy to flip through my swiss roll recipes, I decided to try it out using the Sponge cake recipe. I wouldn't say it's 100% not suitable for swiss roll but rather, I think some adjustments in the recipe is required before converting it to a swiss roll. I would suggest adding in some milk and oil. I am lazy on weekends. What to do?

AND so, because my cake base cracked and I have already prepared the inner creaming, I had to pray hard that the chocolate glaze could fully support my awful looking cracked cake base. I was shivering while applying the chocolate glaze. I'M SO AFRAID OF DESTROYING IT! Luckily, I was gentle to enough and the log cake was done.

The kitchen was horrible after that painful glazing. I had to clean up the table top thrice because the whipped cream dripped all over when I hand-whipped it. Phew, what a relief when I saw the cake "safe and sound" after fridging it for 30 mins. My hard work was paid off! It wasn't so bad afterall. The chocolate glaze was nice even though some of the chocolate got burnt. I was so hungry after all the baking and cleaning up and couldn't wait to eat up my cake. Before my Royal Prince Charming start the "gobbling session", I hastily sliced up a portion for myself. *Evil grin*

It's been quite some times since I used my DIY Photoshooting tent. My Royal Prince Charming complained that I should learnt to take pictures in a more natural way and not to rely on the DIY tent for the Visual effects. Well, since he is my Photoshot Guru aka Photographer, I had to listen to him. NO TENT NO TENT NO TENT! Anyway, I still love these pictures because of my Christmas tree. It just make the whole atmosphere smell so Christmas! Hohoho~

Sunday, December 09, 2007

Basic Sponge Cake


Makes 10" Cake

IngredientsAmounts
Egg whites
Egg yolks4
Sugar1 cup
Cake flour1 cup
Baking powder1 tsp
Cold water4 tbsp


  1. In a bowl, whisk the egg yolks and sugar together. When the combination turns pale yellow, add in the cold water.

  2. Sift the flour and baking powder. Add the flour mixture to the batter and blend well.

  3. In another bowl, whisk up the egg whites till stiff. Add the egg whites to the cake batter and fold in gently.

  4. Pour the ready batter into the cake pan and bring to bake at 160 degree Celsius for 35 mins.


This is one of the best sponge cake recipe that I have ever encountered! It's seriously very spongy and soft. I heart it lots. What's more it's foolproof!

I was trying to bake a sponge cake recently and no matter how I try to do, my cake wouldn't rise. Instead, the texture looked like it was as if a "huat kueh". It's so miserable you know. I was pondering what has gone wrong because I followed the recipe exactly. I had no choice but to use another recipe but I got the same texture again :(

I was really low and started surfing the net for more recipes. I came across this old site where I used to frequent for frostings recipes and I realised that they had a column for sponge cake. Without much hesitation, I clicked into it and found this recipe. It is truly nice and worth trying.

This cake is really heaven. I will definitely use it for my birthday cakes in the near future. I AM SO HAPPY! On another note, I am so angry with myself for throwing away the mahjong paper backdrop for my photoshooting! I had no choice but to use my placemats as the backdrop because the color red is really sparking and I thought it makes a good backdrop. Anyway, it wasn't that disappointing but I still prefers a white backdrop ;)


Updates: I think I get happy too easily :( After browsing through many sites about the tactics to make a good sponge cake, I realised that my so called "Perfect" sponge cake wasn't perfect at all. It just merely rose up like how a sponge cake should but the texture totally failed way beyond the passing grade.

A good sponge cake should looks like this:


A failed sponge cake looks like this:


Look at that! My sponge cake seriously looks exactly like the failed product! Arghhhh...
Why on earth did I realise only till now :( 知足常樂未必是種好事~

I need to brush my skills on cake baking. Serious practising! I MEAN IT!
Anyway, I learn that having a rough texture is due to the improper whipping of the egg whites. I guess, I have to start doing another sponge cake today.

Let's pray hard I'll get the right texture ;)

Bye bye Samsung and Hello Toshiba and Sony!

It's sad to bid farewell to my Samsung 37" LCD TV today but I couldn't help it either. I came in First for my Company's D&D Lucky draw and gotten myself a Toshiba 37" LCD Regza Tv + DVD Player + $50 Nets Gift card.

I already had 2 LCDs at home and I couldn't really allocate any more space for the third one. It was a hard choice deciding whether to keep the Samsung or the new Toshiba. After much discussion with my Royal Prince Charming, we agreed to get the Samsung TV off the rack. The Samsung was with us for barely half a year and we bought it at $2599. Now, we are selling it at the price of $1000! Can you believe that? I know it's hard to believe but it's the truth.

The happy buyer beaming with joy shaked our hands and thank us for the offer. Well, count yourself lucky! If I were to have a bigger house, I will definitely keep it for my own use. My parents find the TV too bulky and they already had 2 Tvs too. That's the only alternative.

On a happier note, I got myself a Sony Vaio notebook. I was in a dilemma to choose between pink and white and finally make up my mind to get the royal colour. I always have a fetish for pink but considering that I will be 25 next year, I have to give that thought up. I think pink still suits younger girls better. Now, I don't have to worry about my Royal Prince Charming using the PC as long as I have my notebook, I can do whatever I want!

Christmas Potluck Event

We'll be holding a Christmas Potluck at our cozy home on the 23rd of December. This is the first Christmas in our new home and we are glad that all of our friends will be joining in the fun with us.

There's a long list of To-dos stuffs for this Christmas event! I'm like cracking my brains to decide what to prepare for the night and my Royal Prince Charming is cracking his brains on how to decorate the house. I understand that being the host of the party, we ought to do much more than our invited guests. However, because of my mini kitchen, I am so afraid that I might not be able to cope with all the cooking and thus had to revert the plan to a Potluck party instead.

I am blessed to have my buddies. With no hesitations all all, they put up their hands to signal the " I can help and I am most willing to help" expressions. I am truly blessed :) I know it seems abit hard for the guests to bring their own party food, thus I had designed a menu and I am in charge of most of the main courses. This should help to lessen the load of my beloved guests :D

Without further sayings, below are my wonderful list of food and the wonderful people behind the show :)

  • Tomato Sauce Spaghetti - Happy Mrs Kuo & Royal Prince Charming
  • Texas Buffalo Wings - Happy Mrs Kuo & Royal Prince Charming
  • Potato Salad - Happy Mrs Kuo & Royal Prince Charming
  • Christmas Cookies - Happy Mrs Kuo & Royal Prince Charming
  • Deep fried Spring rolls - Happy Mrs Kuo & Royal Prince Charming
  • Chicken Shepard Pie - Gladis
  • Sotong and Fish balls - Ah Mei & Ah Fen
  • Chinese style Fried Rice - Phei Wen & Ah Seng
  • Jellies - Ah Qi
  • Honey Baked Ham - Ah Min
  • Junkies (Chips and sweets) - Jolene
  • Beverages - FS & Jehanne
  • Christmas Log Cake - Vincent & Gf
  • Ice Cubes - Jin Cong

That's the list at the moment. I believe there are a few more to be added. We are still waiting for some correspondences from the rest of the folks. Let's pray hard that all works well and we get to enjoy Christmas!

An advance thanks to all the guests! Muchas Garcias!

I forgot to add on that on the 24th December which is Christmas Eve, I will be holding a Christmas party for my family. LOL, it's sure a busy busy Christmas for both of us this year :)

I hope my family will like the food that I prepare for them on that night and I appreciate their enthusiasm to join in the party. Let's hope my Christmas Logcake will be a success because I am intending to bake one myself! LOL

Thursday, December 06, 2007

Wholemeal Raisin Bun


Makes 12 buns

IngredientsAmounts
Bread flour320g
Wholemeal flour50g
Salt2 Tsp
Instant dry yeast2 1/2 Tsp
Butter25g
Milk80g
Egg35g
Honey45g

Additional:

  • Raisins
  • Egg Wash
  1. Combine all the dry ingredients in a bowl. Add in egg, honey and milk and mix the combination on low speed.

  2. When a dough is formed, add in the butter and continue to hook at medium speed.

  3. Place the ready dough into a bowl and cover with plastic wrap. Allow a proofing of 60 mins.

  4. When proofed, punched out the air and allow the dough to rest for another 10 mins.

  5. Cut the dough into 6 small portions and flatten each indivdual dough.

  6. Roll the dough like a oval shape. Apply the raisins and coat a layer of egg wash. Roll the dough up like a swiss roll.

  7. Cut the roll into 2 and place it into a chiffon pan. Proceed to do the same for the rest of the dough.

  8. Coat the whole bread dough with another layer of egg wash and allow the 2nd proofing of 45 mins.

  9. Bring to bake at 190 degree Celsius for 30 mins.


I must confess that this was in fact a "testing" product. I was merely trying out my new wholemeal flour and thought of trying to do one wholemeal bread by myself.

All in my mind was to bake a raisin related bread because of the tonnes of raisins that I've stocked up recently. I couldn't figure out what's wrong with me that I did not take the initiative to refer any recipes from fellow baking bloggers or my recipe collections. I think I must be real sick. By the way, I'm on sick leave today and was getting bored at home, so I think the best way to keep me clear of everything is to start with my baking obsession

The ingredients above were merely based on "agaration". Like I mentioned, I did not have any reference thus, I just added in the ingredients by my 6th sense. LOL!

Anyway, I was relieved that the whole bread tasted nice. The outer layer was crispy and the inner was fluffy and soft :) It's a miracle I can say.

Monday, December 03, 2007

Raisins Sprial Roll & Oreo Butter Cake


Makes 8" Cake Pan

IngredientsAmounts
Cake flour225g
Baking powder1 Tsp
Baking soda1/2 Tsp
Salt1/2 Tsp
Butter85g
Sugar150g
Eggs, beaten2
Yogurt240ml
Vanilla Essence1 Tsp
Oreo cookies1 packet


  1. In a bowl, sift all the dry ingredients together.

  2. Cream the butter and sugar together. When well blended, add in the eggs slowly and ensure that the mixture is well mixed.

  3. Fold in 1/2 of the flour mixture into the butter mixture. Add in 1/2 of the yogurt and fold in another 1/2 of the remaining flour mixture. Add in the last amount of yogurt and Vanilla essence. Combine well and fold in the last amount of flour. Blend well.

  4. Take a portion of the oreo cookies and crushed them using a roller pin. Pour the crushed cookies into the batter and blend well. Pour the ready batter into the cake pan and garnish by placing a few of the whole Oreo cookies on top.

  5. Bring to bake at 180 degree Celsius for 35 ~ 40 mins.


Verdict from the Royal Prince Charming: Soft and nice!

My Prince Charming was amazed by the crispy skin of the cake and the fluffiness. He was just in time when I got this cake freshly out from the oven. He couldn't even wait and wanted to eat that right away. I stopped him of course, because my mum always remind me never to eat anything that is just cooked pipping hot because it is very heaty for the body. My Prince Charming has this bad habits of being impatient when it comes to food. :P

This recipe is adopted from Angie of My Kitchen, My Laboratory.
I missed her bloggings :'(


Makes 6 Spiral Raisin Buns

IngredientsAmounts
Cake flour250g
Icing sugar40g
Salt1/2 Tsp
Water90ml
Egg1
Instant Yeast1 1/2 Tsp
Butter40g


Additional:


  • Egg Wash
  • Raisins
  • Sugar
  1. Combine cake flour, icing sugar and salt together in a bowl.

  2. Add in water, egg and instant yeast and continue to mix into a dough.

  3. Once the dough is formed, add in the butter and blend into a smooth and shiny dough.

  4. Place the dough in a bowl and cover with plastic wrap. Allow proofing of 60 mins or when double in bulk.

  5. Punch the air out and knead the dough. Cut the dough into small portions. Roll each portions into oval shape.

  6. Brush the oval shaped dough with egg wash and spread the raisins on top. Sprinkle some sugars and roll up like a swiss roll.

  7. Make a cut in the center of the rolled dough and open it up to form the spiral shape.

  8. Brush the dough with some egg wash and sprinkle some more sugar on top.

  9. Allow the dough to proof for another 45 mins.

  10. Bring to bake at 180 degree Celsius for 20 mins.


Strange enough, no cinnamons or nutmeg were added to this bread. However, my Royal Prince Charming commented that he could taste a tint of either one of the spice in the bread >.<

I was inspired by Lee Lee's Mocking sting bees Bread, thus decided to try a hand on it.
Anyway, I did some modifications to the shape of the bread and omitted the milk powder. I prefer something petite and cute :)

*Updates: I gobbled these breads this morning and realised that the skin of the bread can get hard if it's left overnight but amazing part is, its more to the crispy kind of hardness and the inside of the bread is still soft and chewy. I will definitely try this again :D*

Sunday, December 02, 2007

Plain Puffs


Makes 15 Puffs

IngredientsAmounts
Butter150g
Water150g
Cake flour150g
Baking powder12g
Egg230g ( 4 eggs)
  1. In a small pot, bring butter and water to cook on low heat.

  2. When the mixture starts to boil, sift in the flour and baking powder. Stir the mixture to make sure that the dry ingredients are well blended with the liquid mixture.

  3. Remove the pot from the heat and add in the eggs slowly. Blend the batter fully.

  4. Scoop the batter into a pastry bag. Squeeze the batter in spiral shape onto a grease-proof paper.

  5. Bring to bake at 180 degree Celsius for 25 ~ 30 mins or when puff is golden brown.


Baked these plain puffs for our snack today. The puffs should be filled with custard cream but I omitted that because we have been stuffing ourselves with too much sugar recently. It's time to reduce our sugar intake. I seriously need to start my crunches session again. It's like I've been eating too much ever since I started my baking obsessions.

As usual, the occasionally Fussy-eater, my Royal Prince Charming nagged at me for not giving him any Custard cream. He was yearning for something sweet and begged me to make some fillings. Well, the kitchen is already sparking after I cleaned it up and so, I won't tired myself out to dirty it again. However, not to disappoint my Prince Charming, I topped his puffs with some icing sugar. He had no choice but to ate that. Anyway, he find it quite tasty with the icing sugars.

This recipe came from the book "新手成功烘培DIY" which my mother-in-law bought for me in Taiwan. By the way, my mother-in-law is a taiwanese so most of the time, the things she bought for me are all from Taiwan.

Saturday, December 01, 2007

Korean Bibimbap and kimchi soup


Makes 2 Bowls

IngredientsAmounts
Cooked rice2 bowls
Carrot1
CucumberHalf
Chicken Thighs2 pieces
Mushrooms5 ~ 6
Big green onions1
Bean sprouts1 handful
Gochujang Paste2 Tbsp
Sugar2 Tbsp
Vinegar1 Dash
Water1 Tbsp


Optional: Sunny side up


  1. Boil a pot of water and bring the chicken thigh to cook over medium heat. Remove the chicken when fully cooked and soaked it in a pot of water for 5 mins. Shred the chicken.

  2. In another pot, bring water to boil. One at a time, blanch the shredded carrots, cucumbers, bean sprouts and mushrooms. Drain and set aside for cooling.

  3. Scoop the Gochujang paste and mixed it with sugar, vinegar and water.

  4. In a deep bowl, put in the cooked rice and arrange the shredded chicken, cucumbers, carrots, mushrooms and bean sprouts on top of the rice. Place the sunny side up in the middle of the arrangments.

  5. Add the ready mixed gochujang sauce on top of the egg and serve.


Makes 1 Pot

IngredientsAmounts
Water3 big bowls
Carrot1
Fresh fish fillets2
Kimchi Own preference

Green Onions

*Used the remaining for Bibimbap*


Seasoning: Sesame Oil, Salt, Soy Sauce, Chilli Powder


  1. Bring the water to boil. Add in the carrots and onions.

  2. Cut the fish fillets into small pieces and marinate with the usual seasoning like salt, peper and sesame oil. Set aside.

  3. When the combination in step 1 starts to boil, add in the kimchi.

  4. Turn the heat to low and allow to stew for 2~ 3 mins.

  5. Add in the marinate fish fillets and close the lid for further cooking.

  6. When the soup starts to boil, add in the chilli powder, some salt and soy sauce for taste.

  7. Allow another stewing of 2 mins on low heat. Serve


Both my Prince Charming and me love Korean cuisine alot, especially the stone grilled Bibimbap. I chanced upon this website that has many amazing and easy recipes for Korean cooking. I was eager to try all the recipes because they looked so delicious!

Anyway, I also visited this website " My Korean Kitchen" and found the recipe for the above Bibimbap sauce. I really like bibimbap so I told myself that I must defintely make this dish on our table today. LOL.

The recipe requires Gochujang paste which is actually Hot pepper paste. It can be found in OG Orchard and Carrefour. The paste taste abit like miso sauce in fact. I wonder if my taste buds were playing a prank on me because it was'nt spicy at all. Anyway, the sauce was so marvellous that we even licked our bowl after finishing the big portion of Bibimbap. I can say this is an easy and healthy meal, but you definitely need to spent some time shredding the vegetables like what I did. I started the preparation for like as early as 3pm and ended up finished cooking at 430pm. That equals to a total of 1 hr 30 mins for shredding and cooking both the Bibimbap and soup. I think I need to be faster.

The kimchi soup was nice too. It's good for cold weather! After drinking it, Prince Charming and I perspired so much that we had to take another shower even though we just had one earlier before our dinner starts. The kimchi added a tint of sourish taste to the soup and thus, it makes one's appetite increase. LOL. I think that's the reason why I could actually finished up my whole pot of rice!

I'm so in the mood for Christmas! My Christmas tree is finally up after the tedious setup yesterday night. We just need a couple of oraments to hang up onto the tree. I love CHRISTMAS!


Sausage Rib Bread


Makes 1 loaf

IngredientsAmounts
Bread Flour200g
Cake Flour40g
Sugar35g
Salt¼ Tsp
Instant dry yeast2g
Cold Water70g
Mashed Potatoes30g
Butter15g

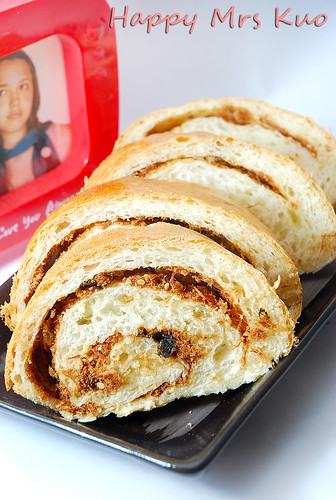
Fillings: Jumbo Chicken Sausage from Carrefour
Brushing: Beaten egg and Ketchup

  1. Combine the flour, salt, sugar, yeast, potatoes and water in a bowl. With the help of a mixer, hook the mixture on low speed. When a dough is formed, turbo the speed to Medium and continue hooking till dough is smooth and shiny.

  2. Add in the butter and adjust the speed to slow. When butter is combined with the dough, turn it back to Medium speed once again. You should get a smooth dough.

  3. Allow the dough to proof for 80 mins.

  4. Once proofed, punch out the air within the dough and let rest for another 10 mins.

  5. Cut the dough into 4 equal portions. Roll the individual portion into an oval shape. Place the hotdog on top of the dough and start to roll the dough up. The hotdog should be covered by the dough.

  6. Cut the wrapped dough into small slice and twist to form the rib-like shape. Allow another proofing of 25 mins.

  7. Once ready, brush the top with some beaten egg and ketchup. This will add shine and an additional flavour to the ready result.

  8. Bring to bake at 180 degree Celsius for 18 mins.


These Sausage Rib breads were supper for my Royal Prince Charming. He was yearning for supper at 10+pm and I got that sixth intuition that he's gonna cook a bowl of Instant noodles. I don't like the idea that he is taking MSG product at such hour, because firstly, MSG is no good for health and the salt content is far too high. Secondly, Prince charming always love to add in many "side ingredients" into his noodles. For example, he can add up to 4-5 items for his noodles and they can range from Luncheon meat to Dice chicken and he's complaining that he is putting on too much weight.

Anyway, I was planning to bake some bread for breakfast tomorrow so it became a killing 2 birds with one stone plan. I get breakfast done and a healthier supper for my Prince Charming.
Flipped through my recipe book and found this. It's so far the shortest time required recipe that I've come across. I need to get the bread done before my Prince Charming comes nagging at me again. Nag for food as usual. LOL.

By the way, I did some really really big mistakes. I think I'm just too tired. The recipe actually required an egg yolk for the dough but I forgotten to add it, also it was supposed to proof for 80 mins but I forgotten all about it when my timer alerts me when it's 60 mins. Thus, the dough was only proofed for 60 + 25 mins instead of the 80 + 25 mins. What's going on! I think I can't really do too many things at the same period of time.

I was helping out my Prince charming with our newly bought Christmas tree. Next, I was hanging the clothes, and next I was washing up the dishes and next I was vacuuming the floor and next I was cleaning the kitchen and next I proofed my dough for only 60 mins!!! What's going on! I guess, I can't really multi-task. Tsk tsk.

Wednesday, November 28, 2007

Seaweed Pork Floss Loaf


Makes 1 loaf

IngredientsAmounts
Bread Flour200g
Salt¼ Tsp
Sugar10g
Plain Yogurt35g
Instant dry yeast2g
Water80g
Butter15g

Filling: Seaweed Pork Floss

  1. In a bowl, combine all the ingredients together exception of the butter. With the help of a mixer, hook the mixture using low speed. When dough is formed, change the speed to medium.

  2. When the dough is no longer lumpy, add in the butter and continuing hooking. As step 1, hook using low speed and changed to medium speed when dough is smooth and shiny. Hooking should takes about 20-30 mins, depending on individual mixer force and speed.

  3. When dough is finally ready, allow to proof for 80 mins. Remember to place the dough in another bowl and cover with plastic wrap.

  4. When the dough has proofed, it should increase double in size. Roll the dough into a big round ball and allow it to rest for another 15 mins.

  5. Next, roll the dough into a rectangular shape. Apply the seaweed pork floss onto the dough evenly. Once done, roll up the dough like the way a swissroll does. Allow the dough to go through another round of proofing for 60 mins.

  6. Coat the dough with beaten egg and bring to bake at 180 degree Celsius for 30 mins.


I have always like the Pork floss buns that can be found in many of the bakeries. However, whenever I recall the amount of butter or mayonnaise that is being applied to it, I got this feeling that a big pile of weight just got clinged onto me. Being a very "bready" person, I can go on 3 meals with just bread, jam and peanut butter. I can even choose bread over a sumptuous meal and my parents could never understand why. Well, neither do I :P

Was flipping through my bread recipe "孟老師的100道麵包" as usual and saw this Pork Floss recipe. Browse through the ingredients and realised that very little or in fact, you can replace the butter with healthier choice like Canola or Olive Oil. It's less fattening, I assume.

The result was good except for the part that I could have done better was the rolling procedure. I guessed if I were to roll the dough tighter, then some part of the bread would not have come loose when I sliced down. Nevertheless, I will nominate this bread to be my every weekend breakfast! It's fast and tasty and soft and fluffy! I'm running out of descriptions but I'm sure you guys will love it! Bon appetit!

Oh, by the way, my seaweed pork floss flew all the way from Taiwan! A complimentary from my Mother in law! LOL! It's surely taste much better than the pork floss we get here.