Thursday, January 31, 2008

Fisherman's Wharf

I nearly forgotten about posting this entry until I saw the pictures in my hard disk. Amazing, very amazing, my memory is getting worse! I need 4 tonnes of Omega pills!

Went to Fisherman's Wharf located right opposite "The Central" at Clark Quay last Saturday. I heard comments that the Fish N Chips over there were generally good. I always love fish related food so even though down with a high fever and super bad flu, I urged my Prince Charming to bring me there!

There are people who can lay their lives for the sake of beauty and there are people who does that for food. Sad to say, I belong to both :( I can lay my live for food but I die-die must continue to diet for the sake of my body. I never want to be that Fat girl during my Primary - Mid Secondary school days.

Anyway, the Fish N Chips over at Fisherman's Wharf may not have that "WOW" verdict but for the price of $6.50, it is generally good. Comparing paying a similar price, the standard is definitely much better than the ones we get from Food courts and Coffee shops.

We ordered a set of Calamaris too. Not too bad, comes with a very unique Tartar sauce. I like the ambience at Fisherman's Wharf. It's just so relaxing. I can feel the breeze from the sea ;)


The value for money $6.50 Fish N Chips set


The Calamaris with a special Tartar sauce

Grumpy and Crumpy Pineapple Tarts


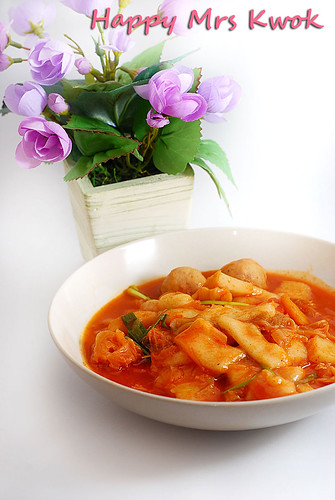
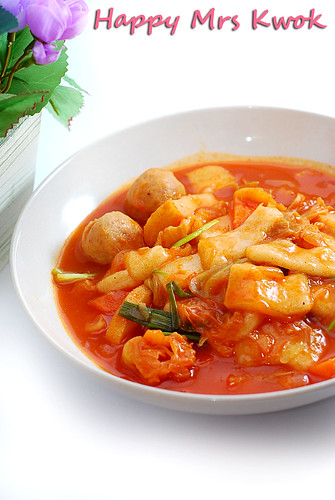
Makes 50 Tangerine tarts / 60 Open tarts

ingredientsAmounts
Pineapple Fillings 450g
All Purpose flour360g
Cold unsalted butter280g
Castor Sugar4 tbsp
Salt 1 tsp
Egg yolks2
Vanilla Essence1 tsp


Egg glaze : 1 egg yolk + a few drops of water


  1. Sift the flour and sugar together and set aside.

  2. Cut the cold butter into small cubes and add them into the flour mixture. Using the "Rubbing-in" method, rub the butter with the flour to form a crumpy dough mixture.

  3. Lightly beat up the egg yolks and vanilla essence. Add the yolk mixture to the crumpy dough mixture and combine and knead into a soft buttery dough.

  4. Wrap the dough up with plastic cling and bring to chill for 1 hour.

  5. On a floured surface, flatten the dough using a roller pin.

  6. Dap the mould with some flour and cut out the dough. Make a dent in the middle of each individual cut out dough.

  7. Arrange the cut out doughs onto a tray lined with greaseproof paper. Bring to bake at 190 degree Clesius for 6 mins.

  8. Scoop 1/2 tsp of pineapple fillings and roll into small balls. Set aside

  9. Glaze the edges of the baked tart base with egg glaze. Top the dent with pineapple fillings.

  10. Bring to bake at 190 degree Clesius for 12~15 mins.

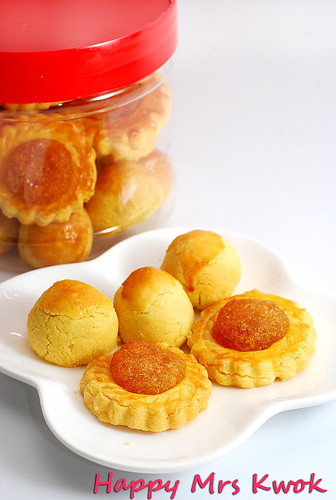
If you are like me who much prefer the Tangerine style, you may just scoop 1 tsp of the dough and roll them into small balls. Flatten the dough with your palm and wrap up the pineapple fillings. Glaze the top with egg glaze and bring to bake.


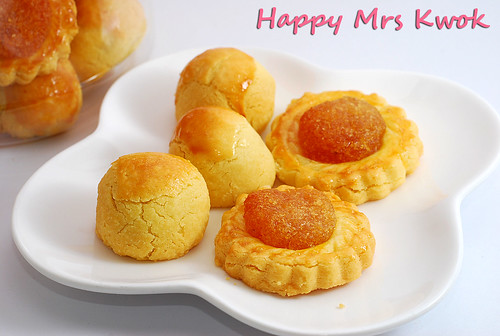
This receipe is basically adopted from Oilin's blog. I love the way she decorates her tangerine pineapple tarts with cloves. It just look so auspicious! These tarts were the kind of "Melt-in-the-mouth" texture and I much prefer these than the crunchy kinds.

Remember me mentioning about my Giantic pineapple tarts? Frankly speaking, I was very disappointed with this current batch of my tarts. Firstly, I got no idea why my tangerine ones crack while baking and secondly, the pineapple filling on the open tarts were a tad too dry for my liking. When I baked the giantic pineapple tarts, everything were the same except the size and they turned out real good. No cracks. I did not try out the open tart for my 1st attempt so I am not too sure if it's suppose to taste that way.

One thing to note that, I did not follow the procedures in step 7 about baking the base before applying egg glaze. I only came to realised when I saw Oilin advising some of the other bloggers about this. By perfoming that step, your tarts will look evenly brown unlike mine :(

Sigh, more practises! I am so going to spend my freaking friday baking these tarts ALL OVER AGAIN! Poor Prince Charming, he don't really fancy Pineapple tarts, imagine that he had to help me finished the batches that I baked recently. Gosh, I so can't imagine how much he will hate pineapple tarts for the next 10 years! LOL!

Wednesday, January 30, 2008

Updates!

Sorry for the late updates. Hasn't been posting any entries recently because I was battling with the flu bug. Because of the flu, all the rest came onto me as well. The list went on to Cough, Fever and throat infection.

It was tedious because I hardly fall sick and this time round, the viruses seem to be so strong that it totally concussed me throughout the whole day. I could hardly pay attention to anything, could hardly stir the wok or even do any house chores. All I want - Sleep, Sleep, Sleep.

The medicines prescribed by my clinic only took effects on the 3rd day of dosage. I was gald at least it's taking effect and I am feeling much better. I baked some pineapple tarts, the tangerine kinds but I'm just too ashamed to show all of you here :P

Because of my short attention lifespan, I had no patience to roll the dough and pineapple fillings into small balls, instead I rolled them into a much bigger portion. My Tangerine Pineapple tarts were in the end, for GIANTS! LOL.

My mum and sister laughed like it was the best joke they have ever seen. I was teased by my colleagues when I brought it to the office yesterday. Well, what's wrong with giantic pineapple tarts? Too big to pop into the mouth? LOL

Thursday, January 24, 2008

My life recently

As per request by my beloved Miss Chew, I am now blogging about my life recently. Don't get too bored my fellow readers/bloggers. I'm not such a boring person :P

Well, work been getting on track for me more or less. I make lesser mistakes now, more alert in pricing my proposals and more efficient in getting my quotes sent to my clients. I think you really need to practice more and get used to what you are doing. My current job has a total different aspects from my previous jobs, thats makes it why I took near to half a year to adapt myself to the "new" environment.

My current colleagues are not bad. I made a few real nice and "clicky" friends but I still miss Miss Chew, Mdm Yeo and Miss Peh a lot. I kind of missed the days where all of us starts complaining about how work sucks and how the students should get bashed. It's just so different but I'm gald I still have my teacher friends in contact now ;)

Speaking about teaching, the other day a weekday which I happened to be on leave, my Royal Prince Charming and I headed to Compass Point for our luninner (Lunch + Dinner) at Sakae sushi, guessed what? I saw my ex HOD and superior inside. I walked past them and it's so obvious that I saw them and they saw me too, BUT they acted as if I'm just a normal stranger. Well, well, well... Maybe they doesn't want the whole world to know that they are dating but too bad, I KNOW! Of course I don't really want to go through this way, imagine me walking over and saying hi to them can get them choked on the sushis. Anyway, they left quite a while after I sat down. Hmm, maybe scared that I might stalked them via the mirror reflection? LOL.

By the way, I did my first Pap smear in my life 3 weeks ago. The experience was not as horrifying as I expected but it's just so weird. Can't imagine myself exposing my lower body to a stranger whom I just met less than 5 mins ago. I think it's a good experience and at least it is not scary. This makes me more comfortable when I know I have to go through this every year.

Marriage life now. It still feel the same like courtship. You know, some people says that once you get married, life change. True, it did change somewhere there and here but overall, the feeling is the same like as though we are still dating. We still do what we used to do during our courtship and I think Royal Prince Charming is more passionate towards me except that he don't give me flowers anymore. He gets me cookwares and recipe books! LOL.

Family wise, everything is still the same. My mummy is using a stronger and better tactic to get me to eat more! Daddy is still that doting towards me and my 2 younger brothers have seem to grown more matured. My elder sister gave birth to my precious niece, Charlotte and indeed, with the addition of baby Charlotte, the whole family gets even more noisy! Everyone is just so excited over Charlotte. Hehehe! Grandma's still very TV addicted towards Serial dramas and I will buy the real "hokkien" versions of the dramas back for her from Taiwan. I think she is going to be so touch that she will kiss me non-stop! LOL.

Friends wise, I miss Miss Chew lor! XD It's been quite sometime since we last met up for a meal or KTV. Let's do it when I come back from Taiwan! Miss Peh just got herself a job and boy, though it takes quite a long time, but it's better than nothing ;) Mdm Yeo, tooo busy to go yoga and contact me, boooo. I gonna smack her when I see her. LOL.

Wednesday, January 23, 2008

Ddeok bok ee ( Korean Hot Spicy Rice cake)


Makes 2 servings

ingredientsAmounts
Ddeokbokki
(Korean rice cake)
7 pieces
Minced onions
1
Oil
2 tsp
Cabbages
1/4 of a normal size
Carrot
1
Pork meat balls
3
Fish cake
1
Gochujang paste
1 1/2 tbsp
Sugar
3 tsp
Pepper
2 dash
Chili powder
1 tbsp
Chicken stock
2 cups
  1. Slice the Ddeokbokki into small thick slices. Cook them in a pot of water over low heat. Make very sure that they are not sticked together else it would be hard to remove them. You may add some oil to the water. Scoop up the ready rice Ddeokbokki and place in a bowl of water. Set aside.

  2. Slice up the cabbage and diced the carrots. Bring the diced carrots to boil and set aside.

  3. Heat up the oil and stir fry the onions. When onions turn soft, add in the chicken stock.

  4. Scoop the Gochujang paste and add into the mixture. Stir well to make sure that the paste get dissolved in the soup mixture.

  5. Bring to simmer for 2 mins.

  6. Add in the cooked diced carrots, meat balls and fish cake. Cover the mixture with pot lid and allow further simmer of 2 mins.

  7. Stir in the sugar, pepper and chili powder. Allow the soup to simmer for 2 mins.

  8. Add in the cooked Ddeokbokki and stir well. Simmer for 30 seconds and it is ready to be served.


Korean cuisine is getting very popular in Singapore. I bet it must be the Korean dramas that created so much impact on this food culture. During my secondary school days, everyone was crazy over J-pop and J-dramas. Japanese food was the very IN food at that times.

I was also amused by the food culture from Korea. I think it's partly due to me being a super big fan for spicy food. Recently, there's been this Korean street food stall opening in the major malls in Singapore. I tried their Spicy rice cake and thought it was delicious. However, it is considered expensive to me because for $3, you are only getting 5 slices of rice cakes and a few of the other ingredients like fish cakes and cabbages. I think it's kind of overprice?

Korean spicy rice cake is a common street food in Korea (duh!). I've always seen many traveling programs introducing it and you know, quite tempted to try it out. I did this dish by how I think it should be done and also based on my taste buds whom had tasted it from the Food stall I mentioned earlier.

I wouldn't say it's near to perfect but I can say the soul is there! Lol! It's somemore 80% similar to the one I've eaten. Anyway, if you not a spicy eater, reduce the chili powder by say half because this dish is real spicy!

Tuesday, January 22, 2008

Angel's hair Aglio


Makes 1 serving

IngredientsAmounts
Angel's Hair
1 person's serving
Minced garlics
4 cloves
Diced bacon
3 streaks
Diced crabsticks
2
Diced sausages
2
Salt
2 tsp
Olive oil
1 tsp
Chicken stock
5 tbsp
Mixed herbs
(Thymes, Rosemary
Parsley etc

2~ 3 dash
(depending on individuals)
  1. Bring Angel's hair to cook over a pot of water. Note that Angel's hair is very fine thus, cooking time will be much shorter than the usual spaghetti and linguine.

  2. In a pan, heat up the oil and stir in the minced garlic over low heat. Add in the diced bacons. Mix well.

  3. Stir the cooked Angel's hair into the mixture and blend well. Add in the chicken stock and allow to simmer for 1min.

  4. Add in the diced sausages and crabsticks, stir throughly and add in the salt for seasoning.

  5. Simmer for another 30 seconds and sprinkle the herbs on top. Ready to serve.


My Royal Prince Charming detest Angel hair so much that he protest against me of doing any pasta recipe with it. Well, he says it taste like Somen?

I had this 1/4 pack of Angel's hair left from the last time I cooked a Tomato based pasta for my colleagues. It's going to expire soon and I know I'm definitely not going to throw it away. Trying my best not to waste any food you know =)

Anyway, I ain't a fussy eater like my Royal Prince Charming. I done up this Angel's hair Aglio for my bento tomorrow. Though I would much prefer a tomato based pasta, I do not want to make myself busy with the washing up. It's always hard to get the bento box real clean if you are cleaning it in the office. Though using lots of detergent, it just gives me a feeling that it is not that clean after all. I always make very sure that all my cutlery and utensils in my household are sparking clean. Well-trained by my mummy I guessed. LOL.

Easy Banana Loaf


Makes 1 loaf

IngredientsAmounts
All purpose flour
1 1/2 cups
Sugar
1 cup
Mashed bananas
4
Egg
1
Butter (Soften)
1/4 cup
Vanilla extract
1 tsp
Baking soda
1 tsp
Baking powder
1/2 tsp
  1. Combine all the ingredients together and blend well.

  2. Pour the ready batter into a loaf pan and bring to bake at 175 degree Celsius for 55 mins.


The ultra soft custard loaf was finished within 1 day and I had to bake another batch of breakfast to go through this week. I wondered how did we managed to stuff the whole loaf of bread down our stomach within 1 day! LOLx.

Anyway, I was quite tired from work today with the clearing of my emails and getting all the proposals processed. After the Japanese curry, I would say I'm falling asleep! Haha! However, I couldn't live without breakfast and I wouldn't allow my Royal Prince Charming to go on an empty stomach to work too. Not wanting to spent too much time on baking a bread, I decided to surf the web for some easy bakes.

Was goggling and found this Easy Banana loaf recipe from Allrecipes.com . Coincidently, I bought a pack of bananas today and finalized my decision to try my hand on this. By the way, I used to not like bananas because I do not like the "marshy" feelings. However, I think as time passes and with influences from my Royal Prince Charming, I am beginning to like it and accept it :)

The loaf was moist and the sweetness is just what both of us like. I'm beginning to get worried that I might need to bake another batch of breakfast soon :P

Monday, January 21, 2008

Japanese Curry Rice


Makes 2 shares

IngredientsAmounts
Japanese Curry cubes
3
Mirin
3 tbsp
Water
2 cups
Diced daikon
Half of whole
Diced carrots
2
Sliced onions
1
Oil
1 tsp
Brown rice
2 bowls
  1. Bring the diced vegetables to cook by the boiling method. When vegetables are well cooked, drain and set aside.

  2. In a non-stick pan, drop oil and allow the oil to get hot on low heat. Add in the sliced onions and stir fry till soft and aroma is out.

  3. Stir in the cooked vegetables and blend well. Pour in water and allow the mixture to simmer.

  4. Cut the curry cubes into small pieces and drop it into the mixture. Stir well.

  5. Add in mirin for a sweeter taste. Allow the mixture to simmer for a few minutes.
    The mixture should get thicken.


Whipped up this dish of Japanese curry as our dinner for tonight. My Royal Prince Charming has a special devotion towards curry especially Chicken Curry and Japanese Curry. This is the nth time that he has requested Japanese curry for dinner.

One thing good about Japanese curry is that it is fast and easy. You can get it done within 30 mins provided you have the vegetables pre-cooked like how I always does the night before. The aroma of the curry always double the hunger crave. LOLX!

Anyway, unlike most Japanese curry, I have opted out the potatoes for Daikon instead. Daikon is also know as white Radish or White carrot to many old folks. It not only contain enzymes that aids in digestion especially starch, it is also very low in calories. I also opted for brown rice instead of the normal thai or calrose rice because brown rice is more nutritious.

Nevertheless, though my Prince Charming hated brown rice as if they stepped on his tail, he could simply lick his plates off with Japanese curry. The power of Japanese curry! Haha!

Sunday, January 20, 2008

Ultra Soft Custard Loaf


Bread dough

IngredientsAmounts
Bread flour
200g
Sugar
30g
Salt
1/2 tsp
Fresh Milk
100g
Instant Yeast
1 tsp
Skimmed Milk powder
15g
Butter (soften)
15g

Custard batter

IngredientsAmounts
Egg yolk
1
Sugar
10g
Bread flour
15g
Fresh Milk
65g
  1. In a pot, combine all the ingredients for Custard batter and bring to cook on low heat. Constantly stir the mixture to make sure that it is not burnt. The mixture shall formed into a gluey custard batter. Allow to cool and bring to chill for 60 mins.

  2. Gather all the ingredients required for Bread dough except butter in a mixing bowl. Add in the custard batter and bring to hook on low heat. When bread dough is formed, switch to medium speed and continuing hooking till dough is smooth and elastic.

  3. Bring to proof for 80mins.

  4. Cut the dough into 3 individual portions and roll into ball-like shape and leave to relax for another 15 mins.

  5. Flatten the dough like a oval shape and roll it up like a swiss roll. Put the rolled doughs into a bread loaf pan and proof for another 60 mins.

  6. Apply a coating of egg wash and sprinkle with some coarse sugar.

  7. Bring to bake at 180 degree Celsius for 20 mins.


I would say this bread live up to its name! It was truly ultra soft. Goodness, I can't believe that it has such fluffy texture that I nearly cried out. Okay, exaggerating a bit. LOL!

Anyway, this recipe as usual was adopted from my favourite bread recipe book "孟老師的100道麵包". I modified a few parts. Replacing water with milk and sprinkling sugar on top. The sugar really add a tint of little surprise when you bite down the 1st mouth. It's just so heaven! This's definitely a keeper!

Saturday, January 19, 2008

Anpan Bread


Makes 5 buns

IngredientsAmounts
Egg
25g
(about 1/2 of an egg)
Sugar
25g
Cake flour
20g
Bread flour
200g
Instant Yeast
1/4 tsp + 1/2 tsp
Water
115g
Soften unsalted butter
15g
Red bean paste
-
Sesame seeds
-
  1. Sift the dry ingredients together and put them into the mixing bowl.

  2. Add in egg and water and hook into dough on high speed. When dough is formed, turn the speed to medium and allow further hooking till dough is smooth, shiny and elastic.

  3. Stir in the melted butter and further hook on low speed. When dough is ready, proof for 60 mins.

  4. After proofing, cut the dough into 5 individual portions and wrap the red bean paste into the dough. Flatten the dough using the hand and dash the top with some sesame seeds.

  5. Allow the wrapped dough to relax for 15 mins.

  6. Once done, proof for another 10 mins .

  7. Bring to bake at 190 degree Celsius for 20 mins.


It's been really quite sometime since I last baked a bread. Got this sudden urge to bake one for tomorrow's breakfast and off I ran to the kitchen to get everything prepared. Since there's still quite an amount of Red bean paste left over from the last mochi session, I decided to make Anpan Bread.

This recipe is adopted from "孟老師的100道麵包". I can say the dough can be hard to manage since it's kinda sticky. My Prince charming ate one of the sample roll and commented it is soft and nice. I felt like taking a bite too but it's already 3am and I'll definitely pile on weights if I continue to eat at such hours. Anyway, my eyelids are on the go of closing down. LOL! Good night!


Updates: I can't believe that this happen! My anpan bread which was left over since last night actually taste softer than it was out from the oven! How amazing! The texture was fluffy and soft. OMG! My Royal Prince Charming actually "snatched" my bun and ate it down his stomach! LOL!

Monday, January 14, 2008

Breakfast Bento


Makes 1 Egg omelete

IngredientsAmounts
Eggs
2
Milk
2 Tbsp
Salt
1 Tsp
Oil
2 Tsp
  1. In a bowl, combine eggs, salt and milk together. Mix well.

  2. On a non-stick saucepan, drip 2 tsp of oil and allow to cook on low heat. Pour the egg mixture into the saucepan.

  3. When the edges of the eggs are cooked, use a chopstick and stir the eggs. Leave the saucepan slightly above the fire.

  4. Flip to have the omelette turned to another side. Ready to be served.


Seriously, I have no intention of making any Breakfast bento. My real intention was to bake a swiss roll for my friends in the office. I promised Joyz that I will bring her some swiss rolls tomorrow and guessed what? When I reached home, I realised that I have ran out of sugar.

Oh my god! How could I forgotten about it? I was still telling myself that I must remember to buy sugar during lunch and yet I still forget about it. I am getting muddle headed recently. Oh no, what's going on? Do I really need Omega 3 pills?

Anyway, I had to bake the swiss rolls tomorrow when the sugar are in stock. In the mean time, I had to fix breakfast for both my Prince Charming and myself. With nothing in mind and nothing I can baked without sugar, I decided to make do with a Bento.

The waffles were bought several months ago and I think it's time to clear them off. I toasted them in the oven and went to watch my TV and so... they got slightly burnt :P The sausages were the same! I told you I'm getting absent minded. The omelettes were done specially for my Prince Charming. He always love to have omelette for breakfast :)

Sunday, January 13, 2008

Second Attempt at Strawberry Jam Swiss Roll


Makes 1 Swiss roll

IngredientsAmounts
Eggs
492g
Sugar
251g
Cake flour
209g
Vanilla Exract
2 Tsp
Oil
73g
Fresh Milk
63g
* I halved the ingredients for a smaller roll*

  1. Sift the flour and vanilla extract. Set aside.

  2. In a mixing bowl, combine the eggs and sugar together. Mix the combination on high speed till the mixture is well combined. The color of the mixture should reflects a Pale yellowish colour and you can see very clear ribbon tracks.

  3. Tune the speed to medium and continue to mix the egg mixture. With the help of a spatula, scoop the mixture up and if the mixture only drips every 2~3 seconds, it means that the egg mixture is ready.

  4. Stir in the sifted flour and combine into a cake batter.

  5. In a small bowl, blend the milk and oil together, making sure they are fully blended with each other. Scoop a small portion of the cake batter and mixed into the oil-milk mixture. Combine well.

  6. Add the combined batter to the remaining batter and mix well.

  7. Layered a sheet of greaseproof paper onto the baking tray. Pour the cake batter onto it and bring to bake at 180 degree Celsius for 20 ~ 25 mins.

  8. Leave to cool for a while and try rolling the cake up. Un-roll the cake and leave to cool fully.

  9. Spread the strawberry jam onto the cake and roll up. Chilled in the fridge for 30 mins before serving.


After the last time I tried Strawberry Swiss roll which somehow demoralized me a little. I decided to re-attempt it again! This time round, I used another cake recipe from the book <大人小孩都愛的海綿蛋糕>. I got this book from PageOne on Friday while at Vivo City waiting for my Prince Charming. This book is truly awesome! They had photo illustrations to show you how you should really get done with the cake.

One thing that I had a little with this book was that most of the time, they use grams for the ingredients even with the eggs! Because different eggs has different weight, it's hard to gauge the correct weight. I had to estimate most of the time.

Nevertheless, the cake came out well. At least you can tell its a sponge cake! LOL! The cake was quite fluffy but I wouldn't say REAL fluffy. I think I have to practice more on Sponge cake baking. Prince Charming was attracted by my Swiss rolls this time and he even "volunteered"
to try them out. LOL.

He commented that the cake was awesome because it is really very spongy. I had it for my breakfast this morning and I can say, I FINALLY SUCCEEDED! Thank god, Amen.

Saturday, January 12, 2008

Mac Fries


No more Mac Fries for me from today onwards. If possible!

Thursday, January 10, 2008

Vanilla Cupcakes


Makes 12" Cupcakes

IngredientsAmounts
Eggs3
All Purpose Flour
210g
Butter (Soften)
113g
Sugar130g
Salt
1/4 Tsp
Baking Powder
1 1/2 Tsp
Vanilla Extract
1 Tsp
  1. Cream butter and sugar till light and fluffy. Add the eggs one by one upon that.

  2. Add in the vanilla extract and continue to blend.

  3. Sift all the dry ingredients together and add it to the butter mixture. Stir well and pour the batter into each individual cups.

  4. Bring to bake at 177 degree Celsius for 18 mins.


My husband asked if I could bake some cupcakes for his colleagues. How could I reject him? Even though I was tired after making the swiss roll, I will still baked for the sake of him :)

Anyway, I am not sure if I've posted this before. If I have, then I need some Omega 3 pills! LOL

Strawberry Jam Swiss Roll


Makes 1 Swiss Roll

IngredientsAmounts
Egg yolks
4
Egg whites
4
Sugar
50g
Cake flour
50g
Whole egg
1
Butter
40g
Warm Milk
40g
Strawberry Jam
As according
  1. Melt the butter in a pot and blend the sifted cake flour into it.

  2. Add the whole egg and egg yolks bit by bit and mix into the butter batter. When this is done, stir in the milk and combine well.

  3. In another bowl, whipped up the egg whites and sugar till stiff peaks are formed. Gently fold the egg whites mixture to the cake batter and blend well.

  4. Layered the swiss roll pan with Greaseproof paper and pour the batter into it. Make sure that the batter is poured evenly.

  5. Bring to bake at 180 degree Celsius for 12 mins or when turn golden brown.

  6. Allow to cool before rolling the cake up. Spread the jam and roll the cake up, chill in the fridge for 30 mins before serving.


I bought a bottle of Strawberry Jam last week and till today, it is still full sitting in my fridge. It's not that I don't like Strawberry jam but this jam that I bought from Isetan was kind of sour. I think because it is low in sugar content thus, that makes it sourish?

Was thinking of trying to use up this jam asap else it might just sit inside the fridge for years! Thus, decided to bake a swiss roll. This recipe was adapted from Flower Bee . The cake is truly smooth BUT my cake did not came out to how Flower Bee ones did :(

I had no problem rolling it up but if only it would have the effects like the ones Flower Bee baked, it would be perfect! Hubby said that mine had the kind of Cheesecake texture, erm without the cheese taste. You know!!! I want it spongy and soft not that kind! Sigh, is it because I did not add in Cream of Tartar? Why why tell me why :'(

Anyway, I seriously need to get myself a proper Swiss roll pan. I am using my cookie pan to bake swiss rolls so that is why my swiss rolls are always fat? LOL!

Monday, January 07, 2008

Dark Chocolate Cake


Makes 6" Cake

IngredientsAmounts
Egg yolks
2
Egg whites
2
Sugar
40g + 40g
Cake flour
15g
Cocoa Powder
35g
Butter
50g
Dark chocolate
55g
  1. Combine egg yolks with 40g sugar and mix well till pale yellowish.

  2. Over a pot of water, melt the butter and dark chocolate.

  3. Combine the butter-chocolate mixture to the yolk mixture in step 1.

  4. In another bowl, beat up the egg whites. Stir in 40g of sugar bit by bit and continue to beat till stiff.

  5. Sift the cake flour and cocoa powder twice and add it to the batter formed in step 3. Combine well.

  6. Add in the egg white mixture into the cake batter portion by portion and fold well.

  7. Pour the ready batter into a 6" pan and bring to bake at 160 degree Celsius for 30 mins.

  8. Sprinkle some icing sugar on top and serve.


I took this recipe from Kiki's website. I've never tried baking a Chocolate flavored cake before and thus, it really took me quite sometime to finally decide to bake this for Prince Charming and my breakfast tomorrow.

The whole process I can say was tedious. Mainly because since it's a very small cake, I did not use my mixer to whip up the yolks and whites. All were done by hands and seriously, both my arms are aching now. LOL! The chocolate batter was very thick and it can be real hard trying to fold the egg whites into it. I was in sweat when the whole batter was finally done. Think I need to practice my stamina!

Nevertheless, the aroma of this cake makes me forgotten about my pain. Prince Charming tried a slice of it and commented that it tasted chocolaty. He didn't really fancy it, so all he could do = gobble up the whole slice as fast as he could. I was kind of sad to see that and asked if it tasted awful. Prince charming then explained that the cake tasted good except that he prefers not to have Dark chocolate ones. Oh well, so the main fault lies with the chocolate because its Dark Chocolate. Oh well...... I know he hated dark chocolate but I still resume to baking it!

Another to add is that, I made a super big mistake! I tuned the temperature to 180 instead of 160 and baked the cake for 30 mins! Can you imagine how my cake came out? The top was kind of dry :( How could I have done such mistake! It's a relief that the whole cake wasn't burnt! I wouldn't want to waste any more food!

Tomato Fried Rice with Scramble Eggs


IngredienStsAmounts
Steam rice
1 bowl
Fresh prawns (Diced)
5 pieces
Oil
2 Tsp
Ketchup
2 Tbsp
Chicken Powder
2 Tsp
Salt
1 Tsp
Beaten eggs
2
Salt
1 Tsp

  1. In a wok, heat up oil and stir in the diced prawns. When prawns turned red, add in the steamed rice.

  2. Stir well to make sure that the rice does not stick together.

  3. Add in Ketchup and blend well with the rice.

  4. Add in chicken powder and salt for seasoning. Mix well and scoop onto a plate and set aside.

  5. Heat up some oil in the wok and when oil is hot, pour in the beaten eggs.

  6. Keep stirring to get the egg scrambled. Remember to cook on low heat prevent the eggs from over cooked.

  7. Top the fried rice with the scrambled eggs.


This is a replica of the Japanese Omurice. It is done almost exactly as how omurice is done except that I've changed the omelette to scrambled egg. Well, this is actually my bento for lunch tomorrow so knowing that my omelette might get squashed while on the way to work, I decided to do it with scrambled eggs instead.

It's a very simple dish to do as it can be done within 10 mins. I'm sure kids will love this fried rice because it's cooked with ketchup! LOL

Sunday, January 06, 2008

Hong Kong Style Radish Cake


IngredientsAmounts
Rice flour
250g
Corn flour30g
Chinese Sausages
(Diced)
3
Minced Pork
300g
Dried Shrimps
(Finely Chopped)
1 Handful
Minced Onions + Garlics
1 + 3
Water
250ml
White Radish
89g
Oil
6 Tsp

Seasonings:
- Salt 2 tsp
- Sugar 2 tsp
- Chicken Powder 2 tsp
  1. Wash the radish, peeled and shred into fine thin slices. Drain away the fluid and set aside.
    DO NOT THROW THE FLUID AWAY! Keep the fluid for later use.

  2. Sift the flour ingredients together. Add in the water and mixed well, followed by adding in the fluid from the Radish and blend well.

  3. In a wok, heat up some oil and stir in the minced onions and garlics and fry till fragrant. Ad in the dried shrimps, Chinese sausages and minced pork. Stir well, scoop onto a plate and set aside for later use.

  4. Heat up the work and add in some more oil and bring the shredded radish to cook. Once the radish is soft, add the batter to the radish mixture and stir well.

  5. Add in the ingredients in step 3, stir in the seasonings and mix till all is incorporated well. The mixture should be thick and gluey.

  6. Pour the mixture into an aluminum pan and bring to steam over high heat at 45 mins.

  7. Allow the radish cake to cool before slicing it. Heat up some oil in a wok and pan fry the sliced radish cakes till golden brown.


This has been on my To-Do list for quite sometime. I was truly in love with Radish cake when I went Hong Kong in 2005. The radish cakes over there were so yummy delicious that I could eat them almost everyday for breakfast while on Holidays :P

In Singapore, it's not very hard to find pan fried Yam cake and local Carrot cake but to find Hong Kong style pan fried Radish cake (With Chinese sausages and minced pork), I guessed that's only available in Dim Sum outlets. It's not very cheap to dine in Dim sum outlet I can say. My mummy's friend spent a wholesome $100+ on dim sum! Worse of all, $100+ for only 2 person! That's seriously very very expensive.

Actually I always wanted to try out doing Yam cake. My mummy makes super whopper heavenly delicious Yam cake. Whether it's purely steam or pan fried, the yam cakes could just make my taste buds dance! How amazing isn't it? So, knowing that I am not possible able to do the perfect Yam cake like how my mummy does, I decided that if I have the crave for yam cake, I shall ask my mummy to make for me instead ;) Seriously, I love all the food my mum whips up. She can cook a dinner for 6 in less than 45 mins! It's really time to go on a cooking training with my mummy.

Anyway, my Royal Prince Charming love this radish cake! He commented that it taste exactly the same as the ones we had in Hong Kong except that mine has a slightly wetter texture. I guessed probably I shouldn't have add in that much water as requested in the recipe? Oh, this recipe was adapted from Leisure Cat. I modified the amount in the recipe as accordingly.

Wednesday, January 02, 2008

臘肉飯


Makes 2 person share

IngredientsAmounts
Rice 2 cups
Chinese Sausages
(Diced)
3
Choy Sin Vegetables
(Cut into small wedges)
1 handful
Chicken stock

2 tbsp +
Enough volume to cover the rice

Sesame oil & Dark sauce 2 tsp each
Diced onions 1

  1. In a pot, heat up some oil and bring the diced onions to fry till fragrant.

  2. Stir in the Chinese sausages and blend well.

  3. Add in the washed rice and combine the mixture.

  4. Allow the rice mixture to simmer for 5 mins. Be sure to stir it occasionally to prevent the rice from getting burnt at the bottom.

  5. Stir in the chicken stock and simmer for another 7-10 mins.

  6. Add in the vegetables and stir well.

  7. Sprinkle the sesame oil and dark sauce. Mix well.

  8. Scoop the mixture into the rice pot and cover the rice with Chicken stock. Bring to cook using a rice cooker.

    *Top the ready rice with Fried onions (optional)


This recipe originated from 小小米桶's 臘肉飯. I was browsing through 米桶's blog for some Chinese recipes and came across this. Was so tempted with it since both my Royal Prince Charming and I love Chinese sausages. I know its not healthy to take such stuff but we'll only eat once in awhile alright? :P

Anyway, tomorrow I will have to accompany my prince charming to collect his air ticket from China Airline ticketing office at Tong Building. Well, since my Royal Prince Charming is not working in orchard area, he has to forsake his lunch hour to rush down to collect his ticket. My office is quite near to Tong building thus, I decide to make our lunch so that I can accompany my prince charming and have lunch with him since I'm very sure he wouldn't have the time to source for food later on.

Btw, I modified some of the recipe. Did not add in any water to cook the rice as what 米桶 did because I wanted the kind of 粒粒分明 texture so I decided to let the rice cook with the chicken stock I added in. I changed the garlic to onions because I personally prefer onions to garlics. Due to the low amount of water added, you need a longer time for the rice mixture to be cook throughly. Mine took 1 hour and still tasted rather hard :( No choice, I had to stir in Chicken stock which must be sufficient enough to cover the rice so that the rice will be soft when cooked. Gosh, I should have added in water in the first place! I bet it will take much much lesser time. LOL!

Well, I'll treat this as a learning tactic for me ;)
Nevertheless, this is real good but slightly less healthy. Try it once in a blue moon only okie? :P

Tuesday, January 01, 2008

Sweet Picnic & Happy 6th Months Wedding Anniversary


It was thankfully quite a good weather today. I was still worried that it might rain heavily but luckily the drizzle only came when both me and my Royal Prince Charming were about to head home. Thank god! This picnic session has been in our plan since weeks ago but whenever we decides to head out for picnic on a particular day, it would rain cats and dogs :( I guessed it is not a very good idea to plan picnic sessions in 4th quarter of the year because its the monsoon season. LOL!

Anyway, both of us enjoyed our picnic session loads! It's been quite sometime since we had such meaningful outing just for the 2 of us. Most of the time, both Prince Charming and I would either drop by in town for some shoppings/window shoppings or we would stroll around our neighborhood malls or just stay home to watch DVDs. I always have a liking towards picnic sessions. It is always my dream to plan Picnic every week if possible but I think it's quite hard since my Royal Prince Charming is so obsessed with his online gaming as usual :P Maybe once a month should be fine!

The day ended with us fully bloated with the bentos I prepared and cycling around East Coast Park. The whole park was fully crowded with people because it's a globally international public holiday. I would much prefer if the park wasn't so crowded after all. It's like every step I take, there's someone in front! Imagine the crowd during CNY at Chinatown. It's something like that!

Anyway, HAPPY NEW YEAR to all fellow bloggers! May this new year be a blissful and fruitful one! :)

Some pics for sharing:


Lovely Dovey Slippers


A super whoper cute little girl we spotted at East Coast Park!~


The mysterious inside of my Chicken Pie! LOL


For those who are interested to take a look at the Bentos I've prepared, you may view here at my Flicker Album . Of course, my bento were not very professional as compared to Peony , Happy Home Baking and Aimei. I really need to learn from them :)