Saturday, March 29, 2008

Kimchi Fried rice + Pork dumplings


Kimchi Fried Rice
Serves 2

IngredientsAmounts
Cooked rice2 bowls
Chopped Kimchi250g
Cubed Crab sticks2
Cabbage slices3 slices
Minced pork100g
Oil3 tsp
Salt2 tsp
Water (optional)2 tbsp
Cubed onions1/2 of a small one
Beaten egg1

  1. Heat up the wok and add in the oil. Stir in the cubed onions/garlics.

  2. Add in the minced pork and stir well. Make sure the meat does not stick to each other.

  3. Pour the cooked rice into the wok and stir well. Make sure that the rice does not clump together.

  4. Stir in the beaten egg and blend well. Gather the cubed crabsticks and cabbage slices and stir into the rice mixture.

  5. When rice is fully mixed with the ingredients, add in the kimchi. Stir well.

  6. Add in salt and ready to serve. (If your rice is a tad too dry, you may add in some water)


This was what we had for our dinner. It's a simple meal as we had a rather heavy lunch earlier on. It's easy and fast to whipped up this Kimchi fried rice and the taste was just right. Hubby prefers more kimchi in the rice so to compensate, I added some kimchi as his side dish. LOL.

I made some Pork dumplings for our side dish anyway. I just don't know why when I think of Kimchi fried rice, Pork dumplings flashed across my mind. It's like making me have the idea that Kimchi fried rice must be eaten with pork dumplings. LOL. Weird I know :P


This is the pork dumplings that were "forced" by me to eat with my Kimchi fried rice. It's also another easy and simple dish. You just have to season the minced pork with some cubed onions, sesame oil, salt and pepper. Then you wrapped it with wanton/gyoza wrapper and cook them in boiling water. Easy and delicious!

Friday, March 28, 2008

Chocolate Classic Cupcake with Pink Frostings


Makes an 18 Cupcakes

IngredientsAmounts
Self-raising flour225g
Unsalted butter, soften225g
Castor sugar225g
Eggs4
Baking powder1 tsp
Cocoa powder4 tbsp
Vanilla extract1 tsp


Cream Cheese Frosting (Pink)
18 Cupcakes

IngredientsAmounts
Cream cheese, softened200g
Icing sugar175g
Pink colouring1 drop
Shaped sugar sprinkles-


  1. Combine all the ingredients for Cupcake and blend well using a mixer.

  2. Preheat the oven to 180 degree Celsius.

  3. Pour the ready batter into Cupcake cups and bring to bake for 20~25 mins.

  4. Allow cooling before frosting

Pink Frosting

  1. Whisk cream cheese and icing sugar together till light and fluffy.

  2. Add in a drop of pink colouring and blend well till mixture is perfectly coated with pink.

  3. Gather the mixture into a pipping bag and pipe onto the cupcakes.

  4. Decorate the cupcakes with sugar sprinkles.


It's finally Friday again! TGIF rules!
As usual, I decided to bake some cupcakes for my colleagues. This time round, I piped the frosting very carefully onto my cupcakes. Though I wouldn't say they are perfect but at least they looks better than my previous attempt.

I'm glad my colleagues like the frosting this time round. The other time, it was a butter-sugar kind of frosting and many told me that it's so sugary that they felt so hyperactive, LOL. However, the occasionally-fussy eater, my Prince Charming felt that he dislike this frosting :(
He doesn't really like Cream cheese in the form of frosting, he prefers them in cakes =.=

Anyway, it is always hard to please everyone. Now I know which kind of frosting to do for my Prince Charming should he wants some frosted cupcakes :)

Btw, I bought a mini kitchen Island! I just couldn't take my eyes off this darling while shopping with my friends in OG orchard. It looked so wonderful! Just the kind I like to have in my kitchen. Now with my Kitchen Island, I have a offical "mini baking corner" =)

On an additonal note, my kitchen looks much neater since all the baking equipments are organised properly within the Kithcen Island. It's worth my money spent ;)


It's really a mini one, no kidding and it's way cheaper than the one at IKEA! :D


What I like most is that the table-top is layered with tiles ;)

P/s: Thank you Aimei for reminding me about the Fats part. There's actually 225g of unsalted butter required for the cupcakes! Alellujah~

Wednesday, March 19, 2008

Chocolate Chiffon Cake


Makes an 8 inch cake

IngredientsAmounts
Egg yolks150g
Fine sugar112g + 68g
Egg whites100g
Cake flour78g
Cocoa powder20g
Fresh milk40ml
Salt1 pint
Oil40g
Fresh squid1/2
  1. Mixed yolks and 112g of sugar together. Make sure the sugar is fully blended into the yolk mixture.

  2. Add in the oil, milk and salt into the yolk mixture. Combine well.

  3. In another bowl, whipped the egg whites till white foames are formed. Divide the remaining 68g of sugar into 3 portions and add into the egg white mixture. Whipped slowly till stiff peaks are being formed.

  4. Sift the cake flour and cocoa powder. Add the sifted ingredients into the yolk mixture and blend well. to get a smooth batter.

  5. Take a little portion of the egg white mixture and fold into the batter. Combine fully and proceed to add in the remaining egg whites mixture into the batter. Fold gently and make sure the two mixtures are combine perfectly.

  6. Pour the ready batter into the cake pan and bring to bake at 180 degrees Celsius for 20~25 mins.


I baked this Chocolate chiffon cake last night after my failed Pad Thai :(
This is for our breakfast today and I would say, THIS IS REAL GOOD!

The recipe is adapted from <戚風+海綿 輕蛋糕77種>, one of the recipe books I bought from Taiwan during my stay there. I really love this book because they have many steps by steps pictures which makes it very clear for the baker to know the exact baking procedures.

I was just wondering if anyone uses a Chiffon cake as a cake base? This cake really captures the heart of me and my Prince Charming and my Prince charming asked if I could use this as a cake base for any birthday cakes that I will be baking for my family. LOL.

Tuesday, March 18, 2008

The crush of a Pad thai dream

After blogging about my Thai Style Seafood Vermicelli yesterday. I had this itch of trying to cook some Thai dishes again. Remembered I mention that I love pad thai? While I was doing my grocery at Carrefour, my eyes fall onto this packet of Rice sticks. The idea of doing Pad thai flashed across my mind.

Being a Kiasu queen, I always had some recipes printed out and stuffed in some parts of my bag. I searched through my bag and found my Pad thai recipe, which was printed in the office earlier on. I hurriedly got hold of all the necessary ingredients and gave my Prince charming a grin. I AM GOING TO MAKE PAD THAI~ Yohooo!

So, as usual, we rushed home like mad kids and without pausing for some breath, I started with the preparations and the cooking. Everything was fine only when I realised that the rice sticks were rather difficult to handle cause they kept sticking onto my wok! In the end, I had to bite my lips and cook throughout the tiring session ( My hands were awfully tired from stirring the noodles)

Looking at it, I knew it wasn't pad thai :( Anyway, I still sprinkle the crushed nuts and illusionised myself that they were Pad thai. My Prince Charming tasted it and felt that the Pad thai essence were not very visible though he said it was quite tasty (Cause it taste like Char Kway Tiao?) :'(

Sigh.. There goes my Pad thai dream. I thought, if I could cook them myself, then I wouldn't have to spend anymore money buying them outside.


Bye bye Pad Thai ! Hello, Char Kway Tiao :(

Monday, March 17, 2008

泰式涼拌海鮮冬粉 Thai Style Seafood Vermicelli


One Person's serving

IngredientsAmounts
Rice Vermicelli
(冬粉)
2 bunches
Chopped red onionsHalf of a small one
Chopped Chilli Padi2
Chopped Ginger1/2 of small one
Thai fish sauce
(魚露)
4 tbsp
Fine sugar2 1/2 tbsp
Lemon juice1 tbsp
Fresh Prawns4
Fresh squid1/2

  1. Wash the prawns and squid carefully. Cut the squid into small slices and set aside.

  2. Boil a pot of water and bring the rice vermicelli to cook. Drain well.

  3. Combine ginger, chilli, red onions, fish sauce, sugar and lemon juice together. If you find that the dressing is too salty, you may add in 1/2 - 1 tbsp of hot water. Alternatively, you may add in some honey if you much prefer a sweeter dressing but would love to have a healthier choice.

  4. Boil another pot of water with some oil and salt added to it. Bring the seafood to cook and when ready, drain well.

  5. Place the ready rice vermicelli onto a plate and topped with seafood. Pour the dressing over the rice vermicelli and ready to be serve.


My Prince Charming and me both have a liking towards Thai cuisine. I especially love the seafood pad thai! It's just so delicious~! Prince Charming on the other hand, love the Green curry best. He just love his green curry with Maggie mee. LOL. He had that almost everyday during our trip in Bangkok last November.

There's this Thai restaurant in Compass point that serve nice Thai dishes and I always longed to have my pad thai whenever I walked past them. Actually, I wanted to try out with the Pad Thai but I think I need more time since my Prince Charming would prefer to have his dinner before 8pm, so I switched to doing a Thai Style Seafood Vermicelli.

The dressing is similar to the one I learnt from Sunrice but I seem to have lost the recipe and couldn't follow exactly :( I just did on how much I remembered. Luckily, it was still okay, though I think the one I learnt will be much much better. This dish takes very short time and it is well recommend for those who would like to have a quick and light dinner :)

Friday, March 14, 2008

Mini Fruit Tarts


Custard Cream
For at least 20 tarts

IngredientsAmounts
Corn flour2 tbsp
Egg yolk1
Sugar2 1/2 tbsp
Milk100ml

  1. Combine yolk and corn flour together. Whisk till both ingredients are well blended.

  2. Add the sugar slowly into the yolk mixture and mix well.

  3. Warm the milk over low heat. Do not allow the milk to boil..

  4. Stir the warmed milk gently into the yolk mixture and make sure all are well mixed.

  5. Put the mixture on low heat and keep stirring till mixture gets thicken.

  6. Leave to cool and ready to be use.


Tart shells
Makes at least 30 mini tarts

IngredientsAmounts
Cake flour500g
Icing sugar150g
Soften butter250g
Whole eggs150g

  1. Combine butter and icing sugar and mix till light and fluffy.

  2. Add in the eggs slowly and blend well. Make sure that egg is well corporate into the mixture before pouring in another portion.

  3. Once mixture is ready, stir in 2/3 of the flour and mixed well. You may use a mixer as it save a lot of time. Put it on low speed.

  4. Once a dough is form, scoop the dough and knead it gently. Combine the remaining flour and make into a smooth dough.

  5. Roll the dough into longular shape and cut into small equal portions (around a ping pong ball size).

  6. Shape the dough into the tart mould.

  7. Bring to bake at 180 degree Celsius for 20~ 25 mins or when turn brown.


Scooped the custard cream and fill it into the tart shell. Topped each tart shell with fresh fruit and ready to be serve.


I baked these mini fruit tarts for my colleagues and really gald that they like it :)
It's been quite sometime since I last baked something for them and since it's a Friday, having a little treat for them seems fabulous.

Supposed to top the tarts with peach slices too but I think I cut the strawberries and kiwi fruit a tad too huge. No space to squeeze in the peach. Lol. I tried one myself and really like the custard cream. DIY custard cream is so yummy!


Wednesday, March 12, 2008

The different type of flour

I don't know if this sounds stupid, but I've been cracking my head with the differences between Top flour and Cake flour. Someone actually told me that they are the same when I just started my baking journey, but I always has this "insecure feeling" that they are different.

This kept me pondering from the first day I started baking, because I always thought: If they are the same thing, why do PrimaFlour has these 2 flour packed separately? Although, I've always tried my best to get Cake flour since many recipes specially indicated that, sometimes I do meet with some difficulties since the Phoon Huat near my place doesn't cater Cake flour at all. One of the auntie I met in Phoon Huat told me that Top flour = Cake flour and is relatively cheaper, so sometimes if I really couldn't get Cake flour, I go for Top flour.

After several attempts with Top flour, I realised that the texture didn't came out to be what I expected since most of the time, I am always baking sponge cake. I was like so confused for the whole of 3 months till today, I decided to do a small research (I know it's kind of late but I always forget about this thing!) Finally, I've got my answer!


Cake Flour is a superb quality, soft-as-silk flour. It has excellent tolerance to a high amount of butter and sugar, resulting in cakes of good volume. This flour is best used for baking sponge cakes and very rich cakes like pound cakes.

Top Flour is an extra-fine quality flour to give exceptionally smooth and fine texture for your baking needs. It is especially ideal for baking very fine cakes; such as chiffon cakes, swiss rolls, crepes, cake doughnuts and butter cookies.
Extracted from PrimaFlour Website

Now, I know when do I use Top flour and when I use cake flour. :)

Tuesday, March 11, 2008

No Fuss Dinner


Kwokish Meat balls (Beef)

IngredientsAmounts
Fresh ground beef250g
Ketchup1/2 tbsp
Honey Mustard1/2 tbsp
Mirin1/4 tbsp
Olive oil1/4 tbsp
White vinegar1/4 tbsp
Green onion, finely cubed1/4 of a small one
Oyster sauce2 tbsp
Sugar1/2 tbsp
Plain flour batter

1 tbsp of flour +
3 tbsp of water

Mixed herbsA dash

  1. Blend the olive oil into the ground beef and blend well. Add in the onions, honey mustard, ketchup, mirin and white vinegar and mixed well.

  2. Roll the minced meat into balls and set aside.

  3. Boil a pot of water and put the beef balls to cooked. The balls should float slightly when cooked. Drain the water away from the cooked beef balls. Do not throw away the boiling water.

  4. Scoop 10 tbsp of the boiling water and bring to boil. Add in the oyster sauce and mix till oyster sauce is well dissolved.

  5. Stir in the sugar and when sugar is well melted in the mixture.

  6. Stir the flour batter in slowly and mixture should gets thicken.

  7. Pour the thicken sauce over the beef balls and sprinkle with some herbs.


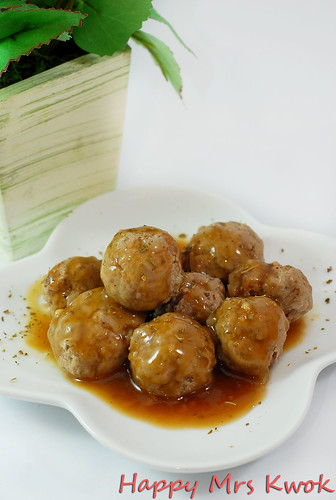
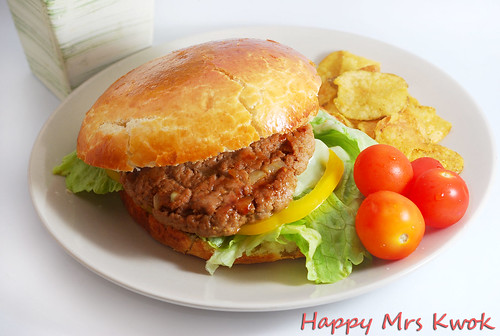
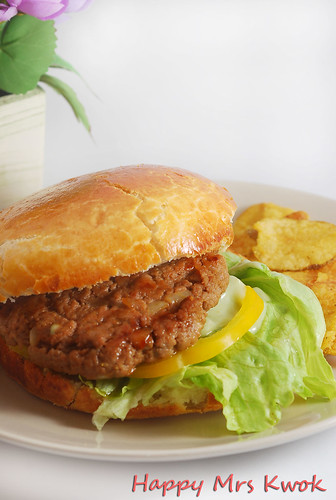
This is the appetiser dish that I make for my Prince charming last night for his No-Fuss dinner. I still had some ground beef and as you know I don't take beef, I had to hurriedly clear them up before they turns nasty again. Since I do not have much time left, I decided to make some beef balls for him because he really love IKEA's Swedish meatballs very much. I thought why not I do a replica for him! Lolx.

I couldn't taste them so verdict has to come from his Royal mouth :P
Prince Charming says that the taste is near to the ones at IKEA just that mine has this tint of herbs aroma. Heh! He love it! Thank god! I was batting with fear that this might not meet his expectations because I did the sauce anyhow =X Amen! His taste buds enjoy the sauce.


Like I said, it was a NO-fuss dinner so I had not much time to cook more things. My Prince Charming doesn't like to have his dinner late and we were in fact rather late home since we did some grocery shopping while on the way back. I popped my head into my cabinets and realised that I have 2 cans of soups that were bought 1 week ago, left untouched. So, I heated them up! We bought a french loaf on the way back home so it was a marvellous plan to have soup for dinner! I always love dipping french loaf into thick chunky soups. Heh.

As usual, within 10 mins, dinner was ready for both of us. I just had to heat the soup up, toast the loaf and cut them up and that's it. Easy job! LOLx. Of course, we couldn't finish the whole loaf so Prince charming asked if I could make them into garlic breads. I told him I'll try since I have only done once with my daddy and it was another "I-think-should-be-done-this-way" method.
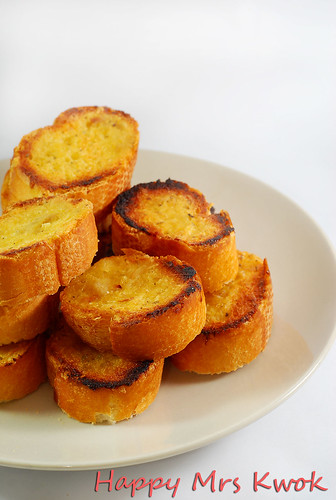


Garlic Bread

IngredientsAmounts
Garlic2 cloves
Soften butter50g
Salt1 tint
Mixed herbs1 dash


  1. Roast the garlic in a toaster oven for 10 mins or when garlic turns soft. (Time depends on the performance of each individual oven. Mine took 10 mins for the garlic to soften)

  2. Scoop out the softened flesh and mashed it.

  3. Add the softened butter to the mashed garlic and mixed thoroughly.

  4. Sprinkle the herbs and salt and mixed well.

  5. Spread the mixture onto slices of french loaf and bring to toast.


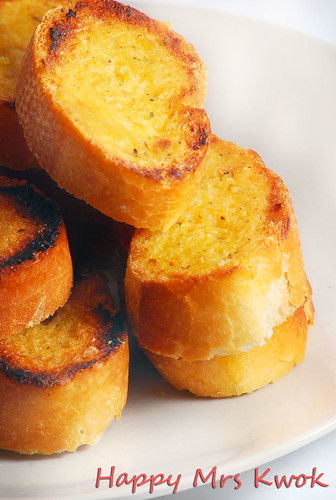
I prayed hard while the french loaf were toasting inside my oven. I got no idea if it will taste good with my DIY garlic spread. The other and only one time that I did this, it was more of my daddy's help that it tasted good and seriously, I forgotten what I did that time. I just had to cross my fingers that this will come out good!

When the oven went "ting" , I yelled for my Prince Charming. You know sometimes I behaved like Courage, the coward dog, so I had to begged my Prince Charming for the help of his taste buds. Lol. He says it was a success! Phew~

Both my parents and I like our bread slightly burnt at the edges but like my Prince Charming, my baby brothers and my sister, they prefer their toast to be just nice. How about you, what is your preference?

Thursday, March 06, 2008

Rainbow Fried Rice


Serves 3

IngredientsAmounts
Rice2 cups
Mixed vegetables1 cup
Cubed CapsicumsHalf
Chicken Hotdogs (Cubed)3
Onions (Cubed)1/2
Crabsticks (Cubed)3
Eggs2
Oil2 tbsp

Chicken powder seasoning
(No MSG option)

3 tsp
Salt2 tsp
  1. Bring the rice to cook and set aside.

  2. In a wok, heat up the oil and when hot, stir in the onions and fry.

  3. Add in the eggs and keep stirring to make sure that eggs get scrambled. Add in the cooked rice and stir vigorously to prevent them from sticking together.

  4. Pour the cubed ingredients (Hotdogs, crabsticks, capsicums and mixed vegetables) into the rice mixture. Mixed well.

  5. Add the Chicken powder seasoning and salt and combined well.


Decided to make a simple meal for tomorrow's lunch. Browse through my fridge and found quite a few ingredients and so, I proceeded to make myself a colourful and appetizing main course. Cooking fried rice is always so fun. You can add in any ingredients that you like and they will still turns out yummy.

My mummy's version always come with fresh prawns and char siew. I love my mummy's fried rice so much that I always requests her to cook but as usual, always get denied since my mummy feels that Fried rice is a tad "heaty" for frequent consumption. She normally does it once in 2 weeks. I think my mummy makes the most yummy fried rice in the world! It's even nicer than ones outside. It's time I sneaked into my mummy's kitchen and "Steal" her recipe! Lol.

Oh, btw pardon the dim photographs! The flash ran out of battery >.<

Tuesday, March 04, 2008

Gloria Jeans

Both me and my Prince charming headed down to Raffles City Shopping center again yesterday. The beaming-with-joy Prince Charming of mine decided to get himself a new cap. He had shortlisted one at Billabong and so, he promised himself that he had to get them by yesterday. Yes, typical men who have to get what they want ASAP.

Anyway, getting a cap was easy. Take the cap, put it on, admire himself in the mirror, walked to the sales associate and ask for a new one and ching ching paid for the item. The whole process took less than 10 mins. After of which, we had no idea where to head to later on.

At the very moment, my taste buds started to yell for desserts. Yay, I told my Prince Charming that I wanted some sweet stuffs and so we headed down to Basement 1 where you can find many F&B shops. We decided to patron Gloria Jeans because of the tempting cakes at their counter.
I chose Oreo Cheesecake and Prince Charming chose Tiramisu. We both shared a large ice tea.

When the cakes arrived, oh my, I felt like my saliva were rushing out! They looked just so tasty and indeed they were! The Oreo cheesecake was very cheesy and the sweetness was just right. The texture is so smooth that it just melts in your mouth. The Tiramisu was fabulous too. The cake was just so soft and moist. There's this layer of sponge cake that lined the sides of the cake. It just matches the Tiramisu so well. Though I may not be a food gourmet, these 2 cakes were really wonderful.

It's my 1st time at Gloria Jeans since most of the time, I prefer Starbucks. This time round, I believe I will definitely opt for Gloria Jeans as they serve really fresh and good cakes.


Monday, March 03, 2008

The Pizza Place and Andersen

Both my Prince Charming and I had pizza for our dinner last Friday. The initial plan was to dine at MOF but I've been like swallowing Japanese food recently and the thought of pushing them down my throat again makes me grumpy.

I decided to opt for Pizza! It's been quite sometime since we had pizza at The Pizza Place which is located at the basement of Raffles City Shopping Center. I can say they serve really good pizza with really good prices. Comparing the price you paid at Pizza hut, I would urge you to try at The Pizza Place instead. I think they are the best pizzas served for this kind of price I had in Singapore.

Chef Pizza is an All-time favourite for me since I'm a spicy lover. The fiery sauce can make you go wild but too bad, when I ordered that on Friday, the server forgotten to put note that I wanted the fiery sauce so the pizza wasn't spicy at all. Anyway, the pizza still tasted good. My Prince Charming is a die-hard addict for cream sauce so he ordered a Creamy seafood Pizza. The seafood were very fresh especially the prawns. I wish I could have the whole platter of pizza filled with prawns! Nevertheless, it is a real good place for pizza.


Today, both of us headed down to Ang Mio Kio for a short shopping trip. I needed some baking wares and there is a shop in AMK central that sells real cheap and good baking wares. After my short and happy spree, we walked into AMK Hub for a short sprint. I've never really tour around in there since it wasn't really in the way for us and my parents find that it is always so crowded with people and it's hard to get a parking lot. To my surprise, they have alot of apparel shops (YAY!) and F&B dinery. Since we already had our lunch, we so wanted to have some desserts.

I was yearning for Andersen's Bailey Scorched Almond ice cream and so we stepped down in Andersen located at the 2nd level of AMK Hub. We ordered a Andersen's Classic that comes with 5 flavour of ice cream of any choice. I chose Bailey Scorched Almond, Rum and Raisins, Macademia Nuts, Strawberry cream and Cookies and Cream. It was truly yummy!


Saturday, March 01, 2008

Beef Burger


Burger bun
(Serves 10 mini buns / 4 large buns)

IngredientsAmounts
Plain flour3 cups
Sugar 1/8 cup
Salt 1/2 tbsp
Oil1/2 cup
Instant Yeast 1/2 tbsp
Warm water1 cup
Beaten Egg1

Beef Patty
(Serves 4 )

IngredientsAmounts
Fresh ground beef800g
Ketchup1 1/2 tbsp
Honey Mustard1 tbsp
Mirin1 tbsp
Olive oil1 tbsp
White vinegar1 tbsp
Green onion, finely cubed1 small one

Burger Toppings

IngredientsAmounts
Guacamole sauce1 1/2 tsp
Ketchup1 tsp
Cherry tomatoes4
Lettuce3 leaves
Yellow Capsicum2 slices

Burger Buns:

  1. Dissolve yeast in warm water with a pinch of salt. Mix the yeast solution with the other ingredients.

  2. Combine the mixture into a dough and knead for approximately 10 mins with the help of a mixer. Allow the dough to proof for 60 mins.

  3. When the dough has proofed, punch out the gas and allow another round of proofing for approximately 50 mins.

  4. Once proofed, punch down the dough. Cut the dough into 4 or 10 parts and form them into bun shapes. Let the bun doughs rest till they double in size.

  5. Coat a layer of Egg wash (Optional) and bring to bake at 190 degree Celsius for 20~25 mins.

Beef Patty:

  1. In a bowl, smashed the ground beef for a couple of times. This will ensure that the beef will turn out to be more tender when cooked.

  2. Pour in the olive oil and blend well into the minced meat. Add in the onions, honey mustard, ketchup, mirin and white vinegar and mixed well.

  3. Shaped the well-mixed minced meat into patties.

  4. In a grill pan, add in some olive oil and bring to heat over low fire. When the oil becomes hot, place the beef patties into the pan.

  5. Using your frying spatula, press down the beef patties with a slight force. This will help to flatten the patty. Fry the both sides of the patty.

  6. When both sides of the patty gets brown, turn off the heat and place the meat patty into the sliced burger bun.

  7. Top the burger with lettuce, yellow capsicum, ketchup and guacamole sauce.

  8. Garnish the burger with cherry tomatoes.


My Prince Charming was yearning for burger and thus, I decided to make one for him. This is the 2nd time I've tried my hand on beef as due to my religion, I am not able to consume any beef products. My Prince Charming on the other hand has no restricts towards any food and beef in fact, is one of his favourite food.

He hasn't been taking beef since our courtship days and even after being married for more than half a year, he has never requested me to make him some, as he find that it may seems a bit selfish cause I couldn't eat them. Of course, I don't mind since I wouldn't be eating them. It doesn't necessary mean that I can't eat them = I can't cook them. LOL! My Prince Charming sometimes worry too much about my feelings, but that's one good point of him and I know he meant it all for me. Thanks darling :)

The burger bun recipe was adapted from some random sites that I happen to chanced upon. Nobody has actually gave a review for it and I thought I could be the 1st one! The bun was crispy on top and soft inside. It's really delicious and I think it would taste best with soups! Awww.. that's making me hungry.

The beef patty recipe was taken from AllRecipes.com. I omitted the Worcestershire sauce as I don't have them at home and I used Honey mustard instead of normal ones as they would add a tint of sweeter taste to the burger. Mirin is also added to reduced the bloody smell from beef (Beef are red blood meat which has this strong blood smell)