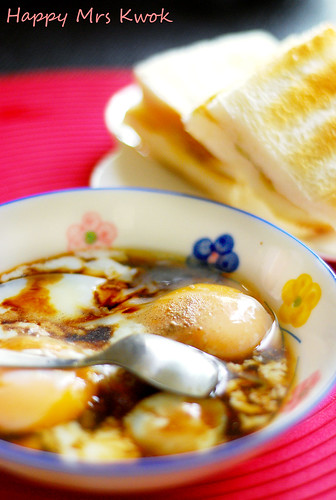
Both me and my Prince Charming love to have our breakfast at Ya Kun especially on Weekends. It's just so nice sipping the hot cup of tea, enjoying the half boiled eggs and munching the cripsy Kaya bread. However, if you do a minor calculations on how much you have to spent on 2 breakfast sets over there every weekends, I think you may consider doing it yourself. I'm a stingy person!
Look here! Let me do the numbers for you:
Breakfast Set A
2 Slices of Kaya bread
1 Cup of Tea or Coffee
2 Half boil eggs
Total: $4.20
2 person cost: $4.20 X 2 = $8.40
Suppose we only visit once a week, that would add up to: $33.60 /month
Now, if you do it yourself, here's the cost:
1 loaf of traditional bread: $1.20 (8 Slices)
2 Lipton tea sackets : approx $0.40
Hot water: FOC
Sugar: approx $0.10
Butter: approx $0.20
Kaya: approx $0.50
Total cost in all: $2.40 X 2 =$4.80
One month: $19.20
You can save up almost 50%! What's more, you don't have to Queue up ;)

I'm actually surprised that my Toaster oven can do such nice effects on the bread. The lines on the toasts looked so nice!
Sunday, April 27, 2008
D-I-Y Breakfast Set
Posted by
Happy Mrs Kwok
at
4:39 PM
![]()
Labels: Chinese 7 comments
Monday, April 21, 2008
The Apple of our eyes
I hasn't been baking recently, therefore the lack of my entries. Been trying very hard to lose some weight. My weight is still hanging at my normal weight but I hope to lose more by May. It's been tough because I'm really on healthy diet and trying very hard to kick off that junking habits. I hasn't been munching on any chocolates, fries or even chips. I haven't really touch a drop on carbonated drinks too! I'm proud of myself actually :P
My family day was spent at my own apartment yesterday. Usually, both my sister and I would go back to our 娘家 in Hougang to spent our Sunday with our parents. My mum would usually whipped up a whole table of food, just for the 4 of us (My hubby + myself and My sister + brother-in law). Yesterday, we decided to have a switch of routine. My mum has been complaining that she hasn't been visiting my apartments for months, so I suggested that all of them can come over to my apartment for our Family Day.
I go for the easier way by doing a steamboat. LOL! It saves up many troubles of preparing the ingredients and cooking them. Also, I have more time for my niece, Charlotte! We just love her to the core! She's the apple of everyone's eyes!
Look at my new dress. My 姨姨 bought it for me!
Ah hah~ This is the matching Hairband my mummy got for me!
Me with my Grandma! I love Grandma!
Me with Grandpa. I love Grandpa!
My mum says I shouldn't pull up my dress. I must sit elegantly.
My mum is bringing me to the pool so she bought me a swimsuit.
姨姨 says she prefer me in Bikinis. I guessed she maybe buying me one.
Heh~ I can't wait to go swimming with mummy and 姨姨!
That's me with 姨姨! I love her too!
I'm sitting comfortably on 姨姨's big big sofa.
It's me and Grandma again.
We are listening to 姨姨 talking non-stop as usual.
Steamboat for dinner.
Mrs Kwok: I love the Sukiyaki pork slices!
Posted by
Happy Mrs Kwok
at
12:40 PM
![]()
Labels: Family 5 comments
Thursday, April 17, 2008
Sunday, April 13, 2008
Simple Grilled Chicken Salad

Serves 1 | |
|---|---|
| Ingredients | Amounts |
| Chicken breast | 1 medium size |
| Broccoli, chunk size | 1 palm size |
| Carrot, chunk size | 1 palm size |
| Lettuce | 3 slices |
| Olive oil | 2 tbsp |
| Mixed herbs | 1 tbsp |
| Salt | 2 tsp |
| Pepper | 1 tsp |
| Paprika | 1 tsp |
- Boil a pot of water and blanch the broccoli and carrots. Set aside
- Marinate chicken breast with olive oil, pepper, salt, paprika and mixed herbs.
- Bring the marinated chicken breast to grill at 220 degree Celsius for 25 mins, or turn brown.
- Combine the soften broccoli, carrots and lettuce in a bowl. Toss gently.
- Cut the grilled chicken into slices and top onto the vegetables.
* You may add in some dressings as desired*


As usual, this is my lunch for tomorrow. Just a simple salad as I'm trying to shed off some weights and inches. Currently planning to go on a low-carbodryhate diet to see if it works. I'm quite a carbo-person and I think that makes it why I decided to choose the "Semi-Atkins" diet.
Once my carbo intake is reduced plus with the exercises I'm currently engaging, I hope to shed off 10 pounds by begining of May!
Wish me luck my friends!
Posted by
Happy Mrs Kwok
at
11:50 PM
![]()
Labels: Western 3 comments
Wednesday, April 09, 2008
Sakura Denbu Maki roll & Onigiri

| Ingredients | Amounts |
| Cooked calrose rice | 1 1/2cup |
| Sushi vinegar | 3 tbsps |
| Sakura denbu | 1/2 packet |
| Pork floss | 3 tbsps |
| Seaweed wraps | 3 sheets |
| Furikake | 2 tbsp |
- Add sushi vinegar to the cooked rice and mixed well.
- Blend in the Sakura denbu and Furikake.
- Place a sheet of seaweed on to a clean tabletop, fetch some rice and spread across the seaweed. Roll up carefully. Cut into small pieces
- For pork floss maki roll, spread the pork floss on top of the rice and wrap carefully as the floss might drops out. Cut into small pieces.
- Using the remainder rice, with the help of a plastic cling, put the rice in the center of a piece of cling and wrap it up. Shape into triangular shape.


I made these for my lunch tomorrow. The sakura denbu was an impulse buy from Isetan while doing my grocery shopping 2 weeks ago. It was left sitting in my kitchen and I finally used it today. My intention was to make some sushi rolls but looking into my fridge, I guess it's time to replenish some food. There ain't much ingredients I could used for my sushi rolls and because I'm also plain lazy to cook, so I make Maki rolls!
The onigiris were the left over rice afte my maki rolls. I don't want to waste the rice and so I made them into my favourite "triangular rice balls". Looking at my bento, I know it's kind of too much for one's serving. I guessed I have to divide them into lunch and snack! Argh... am I going to lose weight or pile on more? Let it be - lose more pounds and inches off me, PLEASE!
Posted by
Happy Mrs Kwok
at
11:59 PM
![]()
Labels: Japanese 58 comments
Monday, April 07, 2008
U.S Banana Walnuts Bread

U.S Banana Walnuts Bread | |
|---|---|
Ingredients | Amounts |
| Ripe banana | 1 (approx 120 - 150g) |
| Castor sugar | 120g |
| Egg | 60g (approx 1) |
| Cake flour | 180g |
| Baking soda | 3.5g |
| Milk | 40g |
| Oil | 30g |
| Crused walnuts | 60g |
- Mashed banana in a bowl and add in the sugar. Combine well.
- Add the egg into the mashed mixture and blend well.
- Sift the cake flour and baking soda. Pour the flour ingredients into the mixture and fold well.
- Add in milk and oil and make sure these 2 liquids coporate well with the batter.
- Add some walnuts into the batter and mix well.
- Pour the batter into a loaf pan and bring to bake at 170 degree Celsius for 40-45 mins.
* You may also sliced up some bananas and crushed walnuts and top it on the bread.*


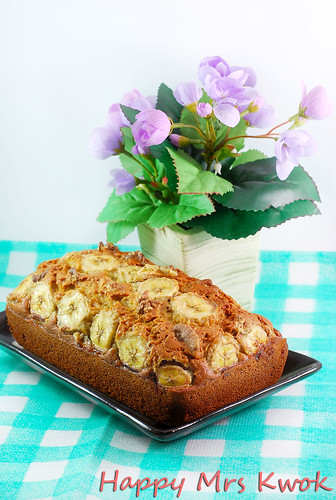
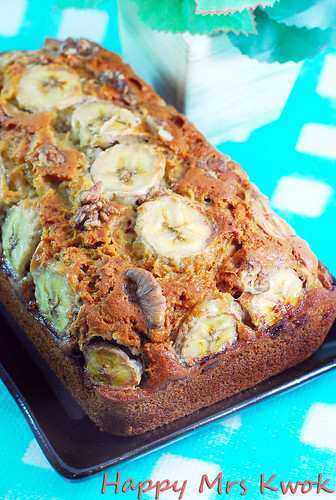
I think I've got into the "Quick bread curse". Looks like I've been baking quick breads recently! I did one last week and yet another one today! What's got into me?
The bananas I bought on Friday were summoning me to bake them since they were getting a little over-riped. The walnuts I bought last week were asking me to bath them with some oven heat. Oh well, what do you get when you have bananas and walnuts? You baked a Banana walnut bread!
There were many Banana bread recipes on the website and previously I did once before minus away the walnuts. I always like quick breads because they make very good breakfast and they are normally easy and takes no longer time to get them done.
By the way, this recipe was taken from one of my recipe books <三個模型的巧思>. I bought this book from Popular bookstore and guessed what, it only costs me $8.90! It's really a good deal because it comes with coloured pages and it features many tempting recipes ;) I think Popular are still selling them. If you are interested, go grab them fast ;)
Posted by
Happy Mrs Kwok
at
12:16 AM
![]()
Labels: Baking, Bread 6 comments
Thursday, April 03, 2008
Chocolate Marble Quick Bread

Makes 9" loaf pan | |
|---|---|
| Ingredients | Amounts |
| semisweet chocolate, chopped | 4 ounces (100 grams) |
| Fresh milk, divide into 2 cups of 60ml | 120ml |
| Plain flour | 210g |
| Baking powder | 2 tsp |
| Sour cream | 1/4 cup |
| Unsalted butter | 113g |
| Sugar | 170g |
| Eggs | 2 |
| Vanilla extract | 1 tsp |
- Preheat the oven to 325 degrees F (160 degrees C) and place rack in the center of the oven. Butter and lightly flour a 9 by 5 x 3 inch (23 x 13 x 8 cm) loaf pan. Line the bottom of the pan with parchment paper. Set aside.
- Melt the chocolate, along with 1/4 cup (60 ml) of the milk, in a stainless steel bowl that has been placed over a saucepan of simmering water. Remove from heat and set aside.
- In a separate bowl, whisk the flour with the baking powder and salt. Set aside.
- In a small bowl whisk together the sour cream and remaining 1/4 cup (60 ml) of milk. Set aside.
- In your electric mixer, or with a hand mixer, cream the butter and sugar until light in color and fluffy. Beat in the eggs, one at a time, until well combined. Beat in the vanilla extract. With the mixer on low speed, alternately add the flour mixture and sour cream/milk mixture, in three additions, beginning and ending with the flour. Spoon half of the batter into a separate bowl. Add the melted chocolate mixture to one half of the batter and fold in.
- With two spoons, place spoonfuls of the two mixtures into the prepared loaf pan alternately (chocolate, white, chocolate, etc.). Run a wooden skewer or knife through the two batters to achieve a marbled effect. Bake in preheated oven for about 50 - 55 minutes or until a toothpick inserted in the center comes out clean.
- Remove from oven and place on a wire rack to cool for 10 minutes before removing from pan. Cool completely.

The texture of this quick bread tasted more of like a pound cake. It was really buttery, moist and smooth. Just the kind that will drive your hyper-activeness out from you. The aroma filled the whole of my kitchen and my hair smells like it too! Yummy!
I took this recipe from Joy of Baking. The swirl effects on the bread should be more visible but because I got no idea how to do it (No demonstration pics available on the website) and the instructions were making me blur, they looked so faint on my bread. Well, pardon a first timer like me :P
Prince Charming took 2 big slices of this bread to work! He msned me in the office and complimented that the bread tasted real good though they were left overnight. This will definitely be on my favourite list.
Posted by
Happy Mrs Kwok
at
10:43 PM
![]()
Labels: Baking, Bread 2 comments
Wednesday, April 02, 2008
My DIY wallpaper
Can you believe that I did these by myself? I painted them with my bare hands! Can you believe? I can't believe myself too!
I only spent 15 mins doing them! *Pat on my shoulders*
Alright, that's a joke. I didn't paint them. They were wallpaper stickers! LOL.
I am still not brave enough to start drawing on my own walls. I'll leave it to my kids in the future! Hehe.
Posted by
Happy Mrs Kwok
at
11:29 AM
![]()
Mini Pandan Chiffon Cake

Makes 8" inch Chiffon cake | |
|---|---|
| Plain flour | 75g |
| Baking powder | 1 tsp |
| Egg yolks | 4 |
| Eggwhites | 5 |
| Sugar | 100g |
| Oil | 1 1/2 tsp |
| Vanilla essence | 1tsp |
| Pandan essence | 1/2 tsp |
| Cream of tar tar | 1/2 tsp |
| Salt | 1 pinch |
- Cream egg yolks, 70 gm of sugar until it is creamy and thick.
- Add in sifted flour and baking powder, vanilla essence, coconut cream/milk, corn oil, pandan paste into the egg yolk mixture. Use machine to mix it well.
- In another bowl, beat egg whites, the rest of the 30g, cream of tartar and a pinch of salt until stiff.
- Mix the eggwhite into the flour mixture and mix it thoroughly using a spatula. Pour into the chiffon pan and bake in a preheated oven at 175C for 45 mins. (My oven doesn't have 175 degree Celsus.
- When cake is ready, invert it immediately to cool down for about 10 mins. After 10 mins, use a sharp knife to loosen the side and then the bottom to release the cake.


I baked these mini pandan chiffon cakes for my Prince Charming's colleagues. This recipe is adopted from Lee Lee.
Btw, I really heart these 2 mini cups which I bought from Daiso. Don't you think they are real cute? Hehe, I bought it not only because they are cute, also that they happen to be the Zodiac animals of me and my Prince Charming. Heee.
My Prince Charming and I attended one of my buddies' Ah mei wedding today at Amara hotel. The poolside ambience was real nice and cozy, though the weather was really hot. The desserts were really oiishi!
Oh! I was given a Peace award by Aimei. Thanks Aimei! It's the first time I've received an award in Blogger. So happy! =)

Posted by
Happy Mrs Kwok
at
12:18 AM
![]()
Labels: Baking 0 comments


