Saturday, March 29, 2008

Kimchi Fried rice + Pork dumplings


Kimchi Fried Rice
Serves 2

IngredientsAmounts
Cooked rice2 bowls
Chopped Kimchi250g
Cubed Crab sticks2
Cabbage slices3 slices
Minced pork100g
Oil3 tsp
Salt2 tsp
Water (optional)2 tbsp
Cubed onions1/2 of a small one
Beaten egg1

  1. Heat up the wok and add in the oil. Stir in the cubed onions/garlics.

  2. Add in the minced pork and stir well. Make sure the meat does not stick to each other.

  3. Pour the cooked rice into the wok and stir well. Make sure that the rice does not clump together.

  4. Stir in the beaten egg and blend well. Gather the cubed crabsticks and cabbage slices and stir into the rice mixture.

  5. When rice is fully mixed with the ingredients, add in the kimchi. Stir well.

  6. Add in salt and ready to serve. (If your rice is a tad too dry, you may add in some water)


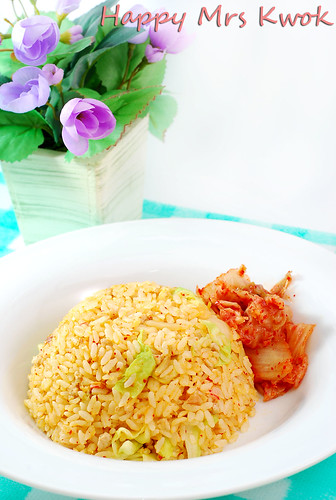
This was what we had for our dinner. It's a simple meal as we had a rather heavy lunch earlier on. It's easy and fast to whipped up this Kimchi fried rice and the taste was just right. Hubby prefers more kimchi in the rice so to compensate, I added some kimchi as his side dish. LOL.

I made some Pork dumplings for our side dish anyway. I just don't know why when I think of Kimchi fried rice, Pork dumplings flashed across my mind. It's like making me have the idea that Kimchi fried rice must be eaten with pork dumplings. LOL. Weird I know :P


This is the pork dumplings that were "forced" by me to eat with my Kimchi fried rice. It's also another easy and simple dish. You just have to season the minced pork with some cubed onions, sesame oil, salt and pepper. Then you wrapped it with wanton/gyoza wrapper and cook them in boiling water. Easy and delicious!

Friday, March 28, 2008

Chocolate Classic Cupcake with Pink Frostings


Makes an 18 Cupcakes

IngredientsAmounts
Self-raising flour225g
Unsalted butter, soften225g
Castor sugar225g
Eggs4
Baking powder1 tsp
Cocoa powder4 tbsp
Vanilla extract1 tsp


Cream Cheese Frosting (Pink)
18 Cupcakes

IngredientsAmounts
Cream cheese, softened200g
Icing sugar175g
Pink colouring1 drop
Shaped sugar sprinkles-


  1. Combine all the ingredients for Cupcake and blend well using a mixer.

  2. Preheat the oven to 180 degree Celsius.

  3. Pour the ready batter into Cupcake cups and bring to bake for 20~25 mins.

  4. Allow cooling before frosting

Pink Frosting

  1. Whisk cream cheese and icing sugar together till light and fluffy.

  2. Add in a drop of pink colouring and blend well till mixture is perfectly coated with pink.

  3. Gather the mixture into a pipping bag and pipe onto the cupcakes.

  4. Decorate the cupcakes with sugar sprinkles.


It's finally Friday again! TGIF rules!
As usual, I decided to bake some cupcakes for my colleagues. This time round, I piped the frosting very carefully onto my cupcakes. Though I wouldn't say they are perfect but at least they looks better than my previous attempt.

I'm glad my colleagues like the frosting this time round. The other time, it was a butter-sugar kind of frosting and many told me that it's so sugary that they felt so hyperactive, LOL. However, the occasionally-fussy eater, my Prince Charming felt that he dislike this frosting :(
He doesn't really like Cream cheese in the form of frosting, he prefers them in cakes =.=

Anyway, it is always hard to please everyone. Now I know which kind of frosting to do for my Prince Charming should he wants some frosted cupcakes :)

Btw, I bought a mini kitchen Island! I just couldn't take my eyes off this darling while shopping with my friends in OG orchard. It looked so wonderful! Just the kind I like to have in my kitchen. Now with my Kitchen Island, I have a offical "mini baking corner" =)

On an additonal note, my kitchen looks much neater since all the baking equipments are organised properly within the Kithcen Island. It's worth my money spent ;)


It's really a mini one, no kidding and it's way cheaper than the one at IKEA! :D


What I like most is that the table-top is layered with tiles ;)

P/s: Thank you Aimei for reminding me about the Fats part. There's actually 225g of unsalted butter required for the cupcakes! Alellujah~

Wednesday, March 19, 2008

Chocolate Chiffon Cake


Makes an 8 inch cake

IngredientsAmounts
Egg yolks150g
Fine sugar112g + 68g
Egg whites100g
Cake flour78g
Cocoa powder20g
Fresh milk40ml
Salt1 pint
Oil40g
Fresh squid1/2
  1. Mixed yolks and 112g of sugar together. Make sure the sugar is fully blended into the yolk mixture.

  2. Add in the oil, milk and salt into the yolk mixture. Combine well.

  3. In another bowl, whipped the egg whites till white foames are formed. Divide the remaining 68g of sugar into 3 portions and add into the egg white mixture. Whipped slowly till stiff peaks are being formed.

  4. Sift the cake flour and cocoa powder. Add the sifted ingredients into the yolk mixture and blend well. to get a smooth batter.

  5. Take a little portion of the egg white mixture and fold into the batter. Combine fully and proceed to add in the remaining egg whites mixture into the batter. Fold gently and make sure the two mixtures are combine perfectly.

  6. Pour the ready batter into the cake pan and bring to bake at 180 degrees Celsius for 20~25 mins.


I baked this Chocolate chiffon cake last night after my failed Pad Thai :(
This is for our breakfast today and I would say, THIS IS REAL GOOD!

The recipe is adapted from <戚風+海綿 輕蛋糕77種>, one of the recipe books I bought from Taiwan during my stay there. I really love this book because they have many steps by steps pictures which makes it very clear for the baker to know the exact baking procedures.

I was just wondering if anyone uses a Chiffon cake as a cake base? This cake really captures the heart of me and my Prince Charming and my Prince charming asked if I could use this as a cake base for any birthday cakes that I will be baking for my family. LOL.

Tuesday, March 18, 2008

The crush of a Pad thai dream

After blogging about my Thai Style Seafood Vermicelli yesterday. I had this itch of trying to cook some Thai dishes again. Remembered I mention that I love pad thai? While I was doing my grocery at Carrefour, my eyes fall onto this packet of Rice sticks. The idea of doing Pad thai flashed across my mind.

Being a Kiasu queen, I always had some recipes printed out and stuffed in some parts of my bag. I searched through my bag and found my Pad thai recipe, which was printed in the office earlier on. I hurriedly got hold of all the necessary ingredients and gave my Prince charming a grin. I AM GOING TO MAKE PAD THAI~ Yohooo!

So, as usual, we rushed home like mad kids and without pausing for some breath, I started with the preparations and the cooking. Everything was fine only when I realised that the rice sticks were rather difficult to handle cause they kept sticking onto my wok! In the end, I had to bite my lips and cook throughout the tiring session ( My hands were awfully tired from stirring the noodles)

Looking at it, I knew it wasn't pad thai :( Anyway, I still sprinkle the crushed nuts and illusionised myself that they were Pad thai. My Prince Charming tasted it and felt that the Pad thai essence were not very visible though he said it was quite tasty (Cause it taste like Char Kway Tiao?) :'(

Sigh.. There goes my Pad thai dream. I thought, if I could cook them myself, then I wouldn't have to spend anymore money buying them outside.


Bye bye Pad Thai ! Hello, Char Kway Tiao :(

Monday, March 17, 2008

泰式涼拌海鮮冬粉 Thai Style Seafood Vermicelli


One Person's serving

IngredientsAmounts
Rice Vermicelli
(冬粉)
2 bunches
Chopped red onionsHalf of a small one
Chopped Chilli Padi2
Chopped Ginger1/2 of small one
Thai fish sauce
(魚露)
4 tbsp
Fine sugar2 1/2 tbsp
Lemon juice1 tbsp
Fresh Prawns4
Fresh squid1/2

  1. Wash the prawns and squid carefully. Cut the squid into small slices and set aside.

  2. Boil a pot of water and bring the rice vermicelli to cook. Drain well.

  3. Combine ginger, chilli, red onions, fish sauce, sugar and lemon juice together. If you find that the dressing is too salty, you may add in 1/2 - 1 tbsp of hot water. Alternatively, you may add in some honey if you much prefer a sweeter dressing but would love to have a healthier choice.

  4. Boil another pot of water with some oil and salt added to it. Bring the seafood to cook and when ready, drain well.

  5. Place the ready rice vermicelli onto a plate and topped with seafood. Pour the dressing over the rice vermicelli and ready to be serve.


My Prince Charming and me both have a liking towards Thai cuisine. I especially love the seafood pad thai! It's just so delicious~! Prince Charming on the other hand, love the Green curry best. He just love his green curry with Maggie mee. LOL. He had that almost everyday during our trip in Bangkok last November.

There's this Thai restaurant in Compass point that serve nice Thai dishes and I always longed to have my pad thai whenever I walked past them. Actually, I wanted to try out with the Pad Thai but I think I need more time since my Prince Charming would prefer to have his dinner before 8pm, so I switched to doing a Thai Style Seafood Vermicelli.

The dressing is similar to the one I learnt from Sunrice but I seem to have lost the recipe and couldn't follow exactly :( I just did on how much I remembered. Luckily, it was still okay, though I think the one I learnt will be much much better. This dish takes very short time and it is well recommend for those who would like to have a quick and light dinner :)