Showing posts with label Bread. Show all posts

Thursday, October 22, 2015

Rilakkuma Pull apart bread

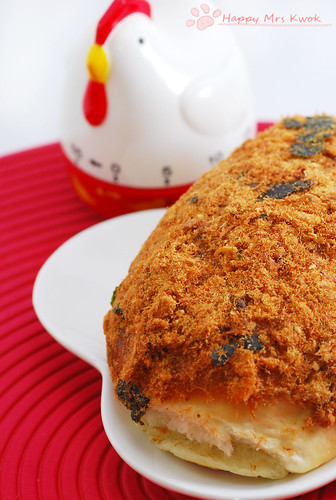
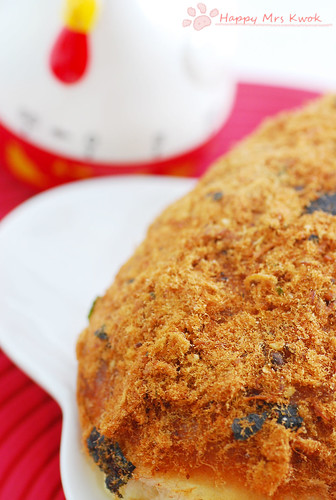
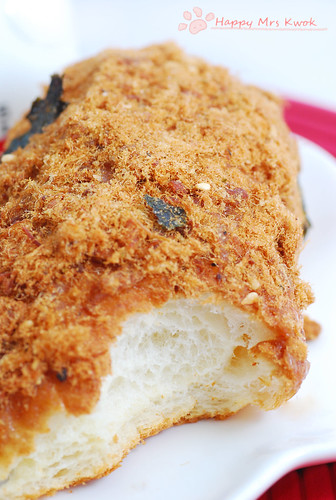
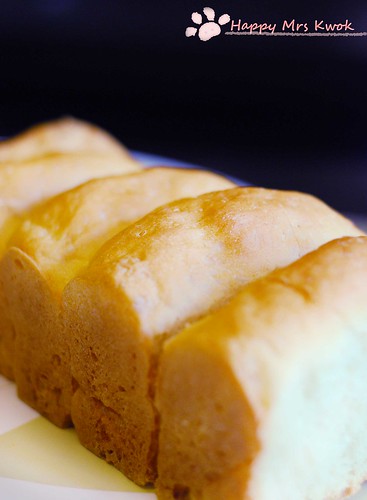
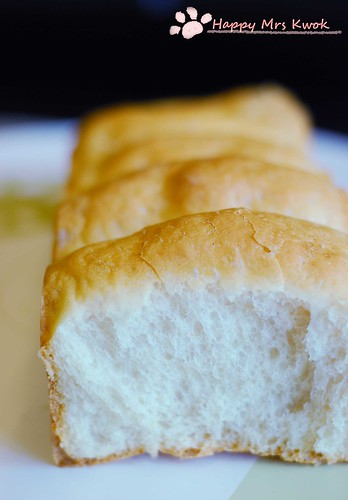
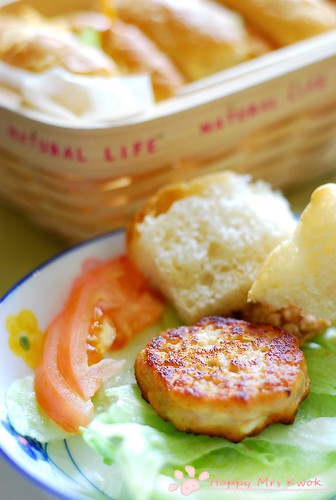
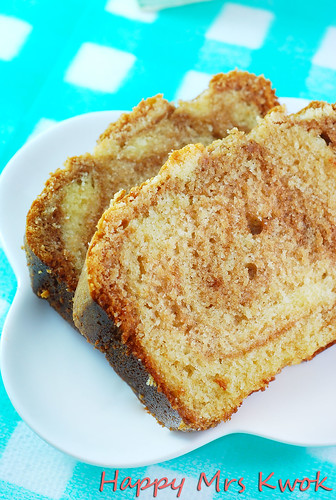
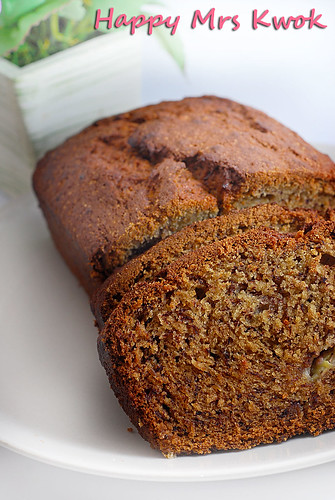
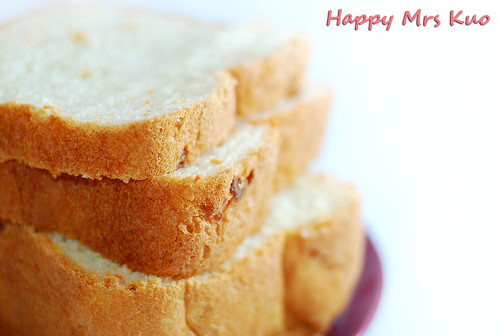
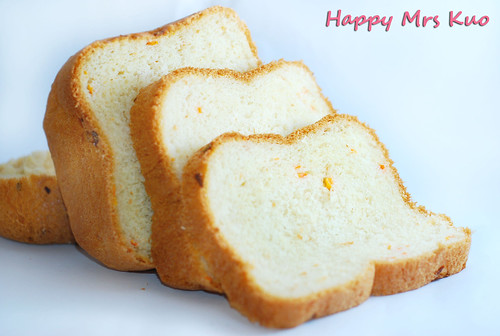
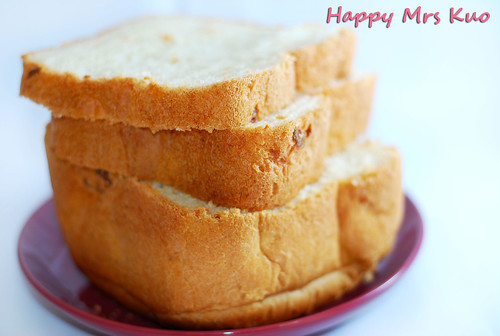
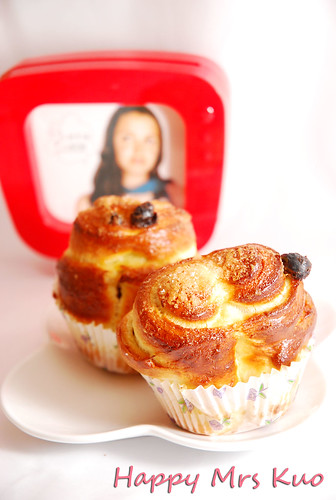
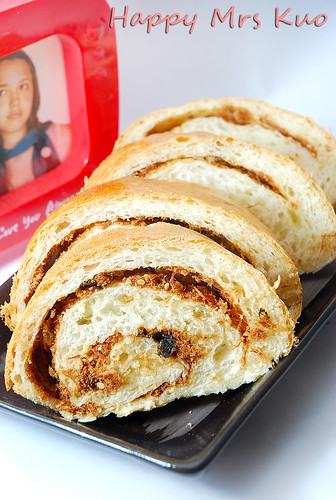
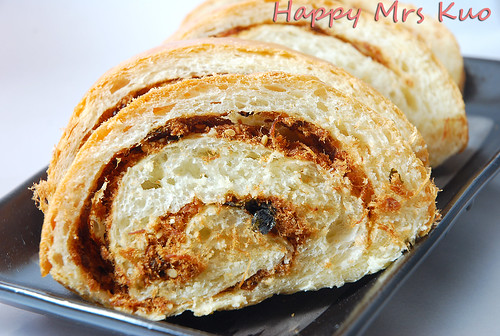
It's been a long time since I attempted bread making. I am a bread person and making good, tasty and fluffy bread is an art which I think is really hard to pursue and master. Even having lessons could not yield me the kind of soft fluffy breads that we get from local bakeries.

The breads that I used to baked are usually good on the day itself but they turned really heavy the next day which is something I am not looking forward to. Another reason to why I am not into bread making is because Baby Kwok #1 and Prince Charming hated breads so much that it just turns them off LOL! No idea why but I guess its because they dislike the constant chewing.

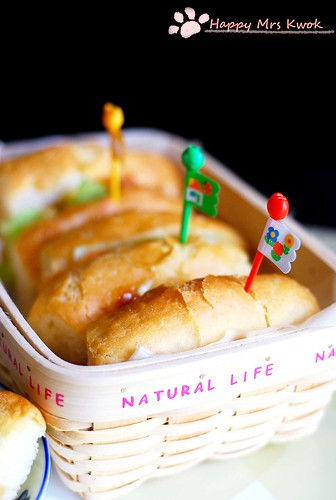
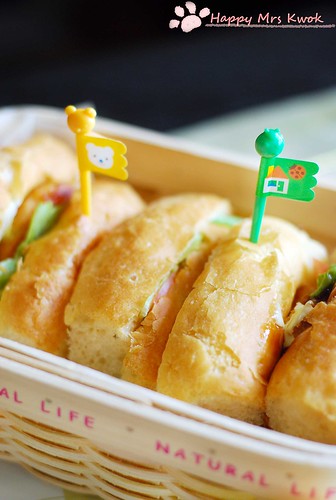
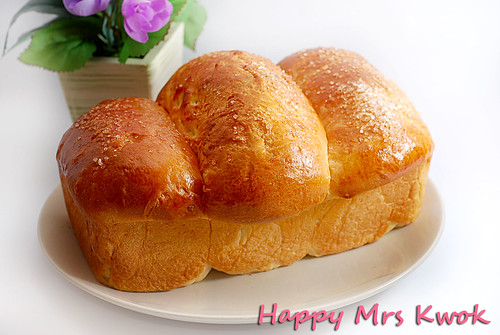
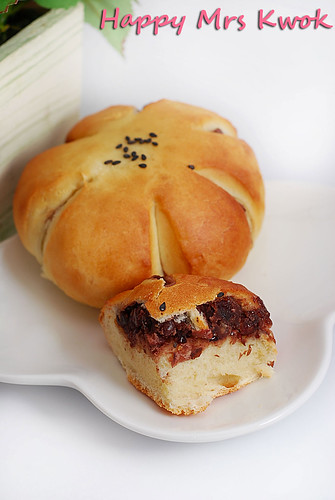
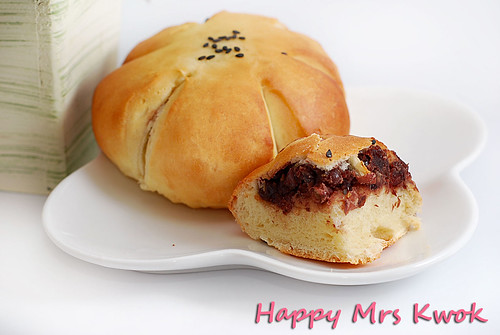
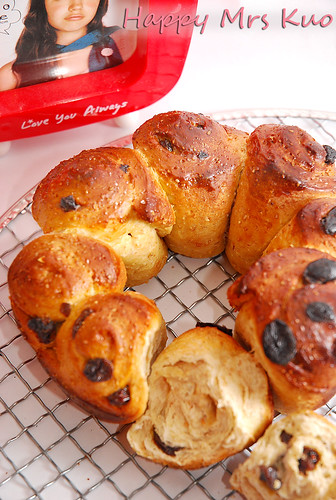
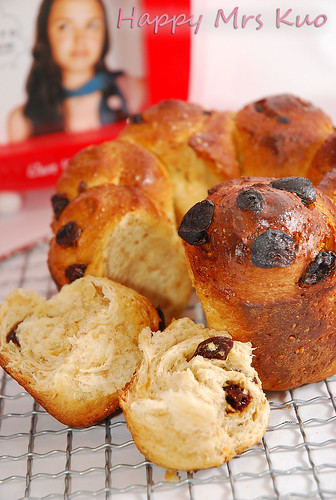
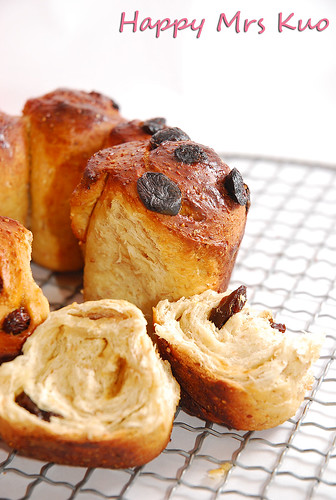
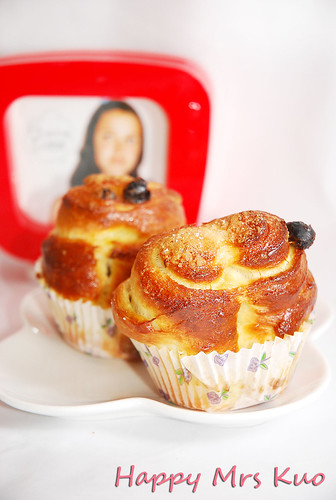
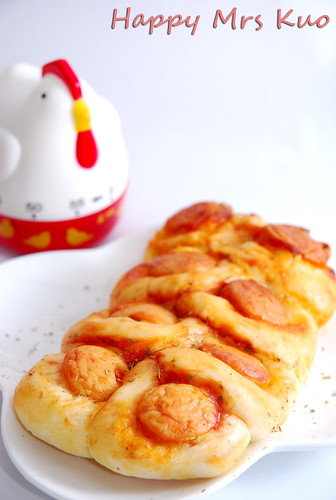
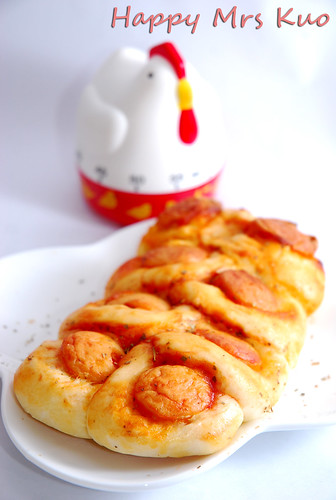
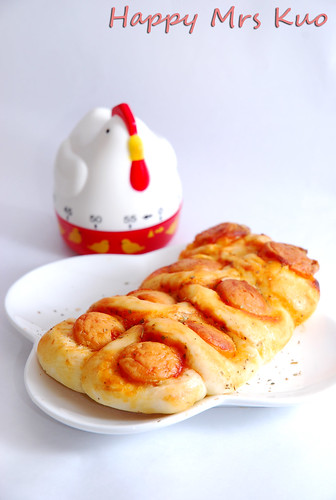
Recently, there was this huge craze over Japanese pull-apart breads where the bakers attempted to convert these breads into really cute and interesting characters. I super love the ones for Totoro and happen to come across 2 floggers who did Rilakkuma version.

I went to my usual Youtube subscriptions and tried my luck searching for a good fluffy rolls recipe. Happened to view the video by Bakingwithmi who shared her dinner rolls recipe and I decided to create my own pull-apart bread with her recipe.

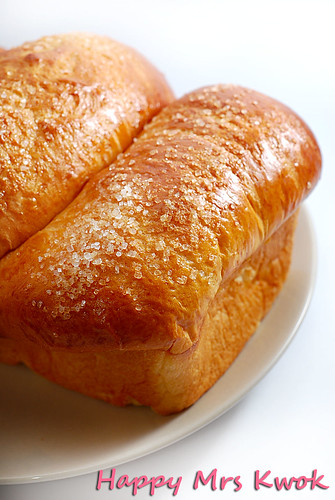
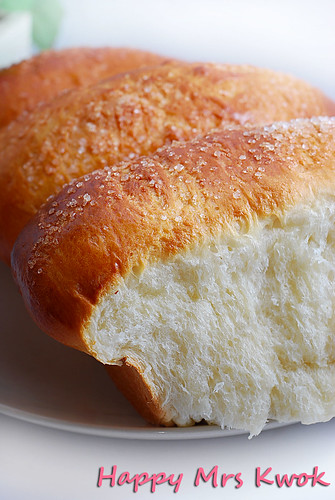
Like I mentioned above, the breads were good on the day itself. I swear they were so soft and good but when I tried them the next day, they became really heavy :( Sigh.. When will I be able to get really good fluffy bread that can stay soft for 2 days at least? If you have a foolproof recipe, please share with me!

Here's my own Rilakkuma pull apart bread :)
I took the tip from Bento days by baking these rolls in a chiffon pan.
 Gracious me forgotten to greased the pan and the bread were stuck terribly :/

If you are interested to try Bakingwithmi's dinner roll recipe, please hop over to her channel in youtube :) 


Monday, November 03, 2008

Raisins Scones


Makes 13-16

Ingredients Amounts
Plain flour3 cups
Butter170g
Sugar1/2 cup
Baking powder5 tsp
Salt1 tsp
Milk1 cup
Beaten egg1

Raisins

1 cup

  1. Combine flour, sugar, salt and baking powder in a deep bowl. Cut butter into small pieces and mix into the flour mixture. Rub the butter with the flour using your finger tips till crumbs like mixture is formed.

  2. Add milk and beaten egg into the crumb mixture and mixed well. If the dough is sticky, you may add in more flour. Pour the raisins into the dough and knead well.

  3. Roll the dough flat onto a floured surface. Cut the dough into circular shape and bring to bake at 200 degree Celsius for 15 mins or till golden brown.


I forgotten where I got this recipe from ( sign of aging *sniffs*) but I wrote that down and stick it onto my fridge, so when I was cracking my brain what to prepare for breakfast, I saw that and was happy since I got all the ingredients on hand, plus I was craving for scones after I ate that at InterContinental Hotel.

This is the second time I'm attempting on scones and the last time, Prince Charming complaint that he does not like fluffy scones so I was crossing my fingers that this is not something that he would fuss about. Quite a relieve that Prince Charming commented he likes this much better than the previous attempt :)

Serves this with your favourite jams and it'll make a good breakfast or high tea ;)

Wednesday, July 23, 2008

Pork Floss Bun


中種面團 Starter Dough

IngredientsAmounts
Bread flour167g
Water100g
Instant yeast1 1/2 tsp

主面團 Basic Dough

IngredientsAmounts
Bread flour167g
Water67g
Butter40g
Sugar40g
Skimmed milk powder15g
Egg20g
Salt 5g

Fillings: Pork Floss


  1. With the help of a Breadmachine/Mixer, mixed the ingredients for Starter into a dough.
    The dough may be slightly dry and sticky but that is okay. Allow the dough to proof for 90 mins.

  2. Combine ingredients for Basic dough (except butter) and knead into a dough. Tear the proofed Starter dough into small pieces and add into the above. When the doughs gets mixed thoroughly together, mix in the butter. Allow kneading till dough is smooth and elastic (Try stretching the dough to determine)

  3. Cut the ready dough into 60g each and roll them into a ball-liked shape. Allow the dough to relax for 10 mins. When done, roll each individual dough into an oval shape and allow another proofing of 45 mins. (You may proof the doughs in the oven with 38 degree celsius set plus a bowl of warm water)

  4. Bake the dough at 190 degree Celsius for 12~15 mins. Allow the buns to cool.

  5. Spread Transparent mayonnaise onto the bun and topped it over with Pork Floss.


I finally took out some time for baking! I cannot imagine that I have not been baking for, I supposed at least 2 weeks :( I just hate it when work's piling so much that I do not have my own time to do things that I really like.

Though I was home rather late (OT-ing as usual), I decided to bake some bread for breakfast! I felt kind of guilty since I haven't been baking any snacks/breakfasts for my Prince Charming lately. I still have 1 and 3/4 packets of Pork floss to go, complimentary from my Mil cause she knows I love pork floss. I decided to make my own Pork Floss buns!

The Transparent Mayonnaise that I made the very last time were chilled in the fridge, so I heated a portion of them up and they were back to the sticky texture again. Prince Charming just love these mayonnaise so much that I applied a super thick layer for his buns. LOL.

I love how soft the buns were, even though left overnight, very fluffy too. I baked a total of 9 buns and only used 3 for Pork floss. Guess I'll be using the rest for other flavours, perhaps Tuna?

Sunday, June 22, 2008

Hamburger Sandwiches


Basic Loaf

Ingredients A Amounts
Bread flour220g
Instants yeast3g
Water130g
Ingredients B Amounts
Bread flour60g
Sugar15g
Salt1/2 tsp
Milk powder10g
Water40g
Ingredients C Amounts
Unsalted butter15g
  1. Combine Ingredients A into a dough. Cover the dough with a layer of cling and allow proofing of 90 mins.

  2. Add Ingredients B into proofed dough and combined into smooth dough. Add in the unsalted butter and make sure it gets knead into the dough thoroughly. Try the stretching test. If the dough is "elastic" enough, allow to proof for another 60 mins, else continuing kneading till it passes the panel test.

  3. Cut the dough into small portions of 70g and round it up like a bun. Allow the doughs to relax for 10 mins.

  4. Flatten the doughs into oval shape and roll it up like a swissroll. Place the rolled doughs into the bread pan and allow another proofing of 50 mins or when dough double in bulk.

  5. Bring to bake at 200 degree Celsius for 30 mins.

Meat Patties

IngredientsAmounts
Minced pork150g
Diced onions30g
Tomato ketchup5 tbsp
Mirin2 tbsp
Salt1 tsp
Corn flour2 tsp
Sugar1 1/2 tsp
Soy sauce1 tbsp
Oil3 tsp
  1. Mixed all the ingredients together.
  2. In a pan, bring the oil to heat. Place the patties into the pan and fry till brown.

Hamburger Sandwiches

  • Lettuce leaves
  • Tomato slices
  • Mayonnaise
  1. Slices the loaf up.
  2. Place 1 meat patty onto 1 slice of bread, top with lettuce and tomato slices.
  3. Apply some mayonnaise over it and finished it with another slice of bread.


Finally I'm back to cooking and baking! The loaf of bread was out this morning at about 2am. I was so terribly tired after all the cleaning up. Luckily it was kneaded by my Bread machine else I wouldn't have the energy to make any hamburgers. Anyway, my loaf turn out to be rather "small" because I do not have any smaller bread pan so I had to place them into my giantic bread pan (about 30cm long) and when they came fresh out from the oven, they look so mini cute! LOL.

Prince Charming was jumping with joy since this is the 1st time I've ever baked for the past 2 weeks. I'm back on my "recovery" and he is really happy about it. Well, I need to work out on my "waiting-list" that has to be transferred to my "to-do List" so that I get to clear them up ASAP. LOL!

Bon Appetite!

Monday, April 07, 2008

U.S Banana Walnuts Bread


U.S Banana Walnuts Bread

Ingredients

Amounts

Ripe banana1 (approx 120 - 150g)
Castor sugar120g
Egg60g (approx 1)
Cake flour180g
Baking soda3.5g
Milk40g
Oil30g
Crused walnuts60g


  1. Mashed banana in a bowl and add in the sugar. Combine well.

  2. Add the egg into the mashed mixture and blend well.

  3. Sift the cake flour and baking soda. Pour the flour ingredients into the mixture and fold well.

  4. Add in milk and oil and make sure these 2 liquids coporate well with the batter.

  5. Add some walnuts into the batter and mix well.

  6. Pour the batter into a loaf pan and bring to bake at 170 degree Celsius for 40-45 mins.

* You may also sliced up some bananas and crushed walnuts and top it on the bread.*


I think I've got into the "Quick bread curse". Looks like I've been baking quick breads recently! I did one last week and yet another one today! What's got into me?

The bananas I bought on Friday were summoning me to bake them since they were getting a little over-riped. The walnuts I bought last week were asking me to bath them with some oven heat. Oh well, what do you get when you have bananas and walnuts? You baked a Banana walnut bread!

There were many Banana bread recipes on the website and previously I did once before minus away the walnuts. I always like quick breads because they make very good breakfast and they are normally easy and takes no longer time to get them done.

By the way, this recipe was taken from one of my recipe books <三個模型的巧思>. I bought this book from Popular bookstore and guessed what, it only costs me $8.90! It's really a good deal because it comes with coloured pages and it features many tempting recipes ;) I think Popular are still selling them. If you are interested, go grab them fast ;)

Thursday, April 03, 2008

Chocolate Marble Quick Bread


Makes 9" loaf pan

IngredientsAmounts
semisweet chocolate, chopped4 ounces (100 grams)
Fresh milk, divide into 2 cups of 60ml120ml
Plain flour210g
Baking powder2 tsp
Sour cream1/4 cup
Unsalted butter113g
Sugar170g
Eggs2
Vanilla extract1 tsp
  1. Preheat the oven to 325 degrees F (160 degrees C) and place rack in the center of the oven. Butter and lightly flour a 9 by 5 x 3 inch (23 x 13 x 8 cm) loaf pan. Line the bottom of the pan with parchment paper. Set aside.

  2. Melt the chocolate, along with 1/4 cup (60 ml) of the milk, in a stainless steel bowl that has been placed over a saucepan of simmering water. Remove from heat and set aside.

  3. In a separate bowl, whisk the flour with the baking powder and salt. Set aside.

  4. In a small bowl whisk together the sour cream and remaining 1/4 cup (60 ml) of milk. Set aside.

  5. In your electric mixer, or with a hand mixer, cream the butter and sugar until light in color and fluffy. Beat in the eggs, one at a time, until well combined. Beat in the vanilla extract. With the mixer on low speed, alternately add the flour mixture and sour cream/milk mixture, in three additions, beginning and ending with the flour. Spoon half of the batter into a separate bowl. Add the melted chocolate mixture to one half of the batter and fold in.

  6. With two spoons, place spoonfuls of the two mixtures into the prepared loaf pan alternately (chocolate, white, chocolate, etc.). Run a wooden skewer or knife through the two batters to achieve a marbled effect. Bake in preheated oven for about 50 - 55 minutes or until a toothpick inserted in the center comes out clean.

  7. Remove from oven and place on a wire rack to cool for 10 minutes before removing from pan. Cool completely.


The texture of this quick bread tasted more of like a pound cake. It was really buttery, moist and smooth. Just the kind that will drive your hyper-activeness out from you. The aroma filled the whole of my kitchen and my hair smells like it too! Yummy!

I took this recipe from Joy of Baking. The swirl effects on the bread should be more visible but because I got no idea how to do it (No demonstration pics available on the website) and the instructions were making me blur, they looked so faint on my bread. Well, pardon a first timer like me :P

Prince Charming took 2 big slices of this bread to work! He msned me in the office and complimented that the bread tasted real good though they were left overnight. This will definitely be on my favourite list.

Saturday, March 01, 2008

Beef Burger


Burger bun
(Serves 10 mini buns / 4 large buns)

IngredientsAmounts
Plain flour3 cups
Sugar 1/8 cup
Salt 1/2 tbsp
Oil1/2 cup
Instant Yeast 1/2 tbsp
Warm water1 cup
Beaten Egg1

Beef Patty
(Serves 4 )

IngredientsAmounts
Fresh ground beef800g
Ketchup1 1/2 tbsp
Honey Mustard1 tbsp
Mirin1 tbsp
Olive oil1 tbsp
White vinegar1 tbsp
Green onion, finely cubed1 small one

Burger Toppings

IngredientsAmounts
Guacamole sauce1 1/2 tsp
Ketchup1 tsp
Cherry tomatoes4
Lettuce3 leaves
Yellow Capsicum2 slices

Burger Buns:

  1. Dissolve yeast in warm water with a pinch of salt. Mix the yeast solution with the other ingredients.

  2. Combine the mixture into a dough and knead for approximately 10 mins with the help of a mixer. Allow the dough to proof for 60 mins.

  3. When the dough has proofed, punch out the gas and allow another round of proofing for approximately 50 mins.

  4. Once proofed, punch down the dough. Cut the dough into 4 or 10 parts and form them into bun shapes. Let the bun doughs rest till they double in size.

  5. Coat a layer of Egg wash (Optional) and bring to bake at 190 degree Celsius for 20~25 mins.

Beef Patty:

  1. In a bowl, smashed the ground beef for a couple of times. This will ensure that the beef will turn out to be more tender when cooked.

  2. Pour in the olive oil and blend well into the minced meat. Add in the onions, honey mustard, ketchup, mirin and white vinegar and mixed well.

  3. Shaped the well-mixed minced meat into patties.

  4. In a grill pan, add in some olive oil and bring to heat over low fire. When the oil becomes hot, place the beef patties into the pan.

  5. Using your frying spatula, press down the beef patties with a slight force. This will help to flatten the patty. Fry the both sides of the patty.

  6. When both sides of the patty gets brown, turn off the heat and place the meat patty into the sliced burger bun.

  7. Top the burger with lettuce, yellow capsicum, ketchup and guacamole sauce.

  8. Garnish the burger with cherry tomatoes.


My Prince Charming was yearning for burger and thus, I decided to make one for him. This is the 2nd time I've tried my hand on beef as due to my religion, I am not able to consume any beef products. My Prince Charming on the other hand has no restricts towards any food and beef in fact, is one of his favourite food.

He hasn't been taking beef since our courtship days and even after being married for more than half a year, he has never requested me to make him some, as he find that it may seems a bit selfish cause I couldn't eat them. Of course, I don't mind since I wouldn't be eating them. It doesn't necessary mean that I can't eat them = I can't cook them. LOL! My Prince Charming sometimes worry too much about my feelings, but that's one good point of him and I know he meant it all for me. Thanks darling :)

The burger bun recipe was adapted from some random sites that I happen to chanced upon. Nobody has actually gave a review for it and I thought I could be the 1st one! The bun was crispy on top and soft inside. It's really delicious and I think it would taste best with soups! Awww.. that's making me hungry.

The beef patty recipe was taken from AllRecipes.com. I omitted the Worcestershire sauce as I don't have them at home and I used Honey mustard instead of normal ones as they would add a tint of sweeter taste to the burger. Mirin is also added to reduced the bloody smell from beef (Beef are red blood meat which has this strong blood smell)

Tuesday, January 22, 2008

Easy Banana Loaf


Makes 1 loaf

IngredientsAmounts
All purpose flour
1 1/2 cups
Sugar
1 cup
Mashed bananas
4
Egg
1
Butter (Soften)
1/4 cup
Vanilla extract
1 tsp
Baking soda
1 tsp
Baking powder
1/2 tsp
  1. Combine all the ingredients together and blend well.

  2. Pour the ready batter into a loaf pan and bring to bake at 175 degree Celsius for 55 mins.


The ultra soft custard loaf was finished within 1 day and I had to bake another batch of breakfast to go through this week. I wondered how did we managed to stuff the whole loaf of bread down our stomach within 1 day! LOLx.

Anyway, I was quite tired from work today with the clearing of my emails and getting all the proposals processed. After the Japanese curry, I would say I'm falling asleep! Haha! However, I couldn't live without breakfast and I wouldn't allow my Royal Prince Charming to go on an empty stomach to work too. Not wanting to spent too much time on baking a bread, I decided to surf the web for some easy bakes.

Was goggling and found this Easy Banana loaf recipe from Allrecipes.com . Coincidently, I bought a pack of bananas today and finalized my decision to try my hand on this. By the way, I used to not like bananas because I do not like the "marshy" feelings. However, I think as time passes and with influences from my Royal Prince Charming, I am beginning to like it and accept it :)

The loaf was moist and the sweetness is just what both of us like. I'm beginning to get worried that I might need to bake another batch of breakfast soon :P

Sunday, January 20, 2008

Ultra Soft Custard Loaf


Bread dough

IngredientsAmounts
Bread flour
200g
Sugar
30g
Salt
1/2 tsp
Fresh Milk
100g
Instant Yeast
1 tsp
Skimmed Milk powder
15g
Butter (soften)
15g

Custard batter

IngredientsAmounts
Egg yolk
1
Sugar
10g
Bread flour
15g
Fresh Milk
65g
  1. In a pot, combine all the ingredients for Custard batter and bring to cook on low heat. Constantly stir the mixture to make sure that it is not burnt. The mixture shall formed into a gluey custard batter. Allow to cool and bring to chill for 60 mins.

  2. Gather all the ingredients required for Bread dough except butter in a mixing bowl. Add in the custard batter and bring to hook on low heat. When bread dough is formed, switch to medium speed and continuing hooking till dough is smooth and elastic.

  3. Bring to proof for 80mins.

  4. Cut the dough into 3 individual portions and roll into ball-like shape and leave to relax for another 15 mins.

  5. Flatten the dough like a oval shape and roll it up like a swiss roll. Put the rolled doughs into a bread loaf pan and proof for another 60 mins.

  6. Apply a coating of egg wash and sprinkle with some coarse sugar.

  7. Bring to bake at 180 degree Celsius for 20 mins.


I would say this bread live up to its name! It was truly ultra soft. Goodness, I can't believe that it has such fluffy texture that I nearly cried out. Okay, exaggerating a bit. LOL!

Anyway, this recipe as usual was adopted from my favourite bread recipe book "孟老師的100道麵包". I modified a few parts. Replacing water with milk and sprinkling sugar on top. The sugar really add a tint of little surprise when you bite down the 1st mouth. It's just so heaven! This's definitely a keeper!

Saturday, January 19, 2008

Anpan Bread


Makes 5 buns

IngredientsAmounts
Egg
25g
(about 1/2 of an egg)
Sugar
25g
Cake flour
20g
Bread flour
200g
Instant Yeast
1/4 tsp + 1/2 tsp
Water
115g
Soften unsalted butter
15g
Red bean paste
-
Sesame seeds
-
  1. Sift the dry ingredients together and put them into the mixing bowl.

  2. Add in egg and water and hook into dough on high speed. When dough is formed, turn the speed to medium and allow further hooking till dough is smooth, shiny and elastic.

  3. Stir in the melted butter and further hook on low speed. When dough is ready, proof for 60 mins.

  4. After proofing, cut the dough into 5 individual portions and wrap the red bean paste into the dough. Flatten the dough using the hand and dash the top with some sesame seeds.

  5. Allow the wrapped dough to relax for 15 mins.

  6. Once done, proof for another 10 mins .

  7. Bring to bake at 190 degree Celsius for 20 mins.


It's been really quite sometime since I last baked a bread. Got this sudden urge to bake one for tomorrow's breakfast and off I ran to the kitchen to get everything prepared. Since there's still quite an amount of Red bean paste left over from the last mochi session, I decided to make Anpan Bread.

This recipe is adopted from "孟老師的100道麵包". I can say the dough can be hard to manage since it's kinda sticky. My Prince charming ate one of the sample roll and commented it is soft and nice. I felt like taking a bite too but it's already 3am and I'll definitely pile on weights if I continue to eat at such hours. Anyway, my eyelids are on the go of closing down. LOL! Good night!


Updates: I can't believe that this happen! My anpan bread which was left over since last night actually taste softer than it was out from the oven! How amazing! The texture was fluffy and soft. OMG! My Royal Prince Charming actually "snatched" my bun and ate it down his stomach! LOL!

Thursday, December 20, 2007

Carrot Loaf


Makes 750g Loaf

IngredientsAmounts
Bread flour450g
Butter1 1/2 Tbsp
Sugar2 Tbsp
Salt1 tsp
Diced Carrots56g
Water250ml
Instant Dry Yeast1 Tsp

  1. Gather all the ingredients except diced carrots into the Bread Machine.

  2. Select "Basic" program and Loaf size of 750g. Proceed to press "Start".

  3. When the doughing process has finished, there will be a beeping sound. Open up the lid and add in the dice carrots.

  4. Allow the machine to function. The bread machine will continue to proof and bake the loaf.
    The whole process should take around 3 hours.


I got a surprise when I got back home last night. As my Royal Prince Charming was out with his friends, I went for my Yoga session as usual. When I got home and stepped into the kitchen, I saw this bulky box sitting on my table top.

Initially, I thought that my Prince Charming had brought out the Deep Fryer Machine which we just bought last week and so I was curious why he actually got it out from the storeroom. I walked forward and realised its not my Deep Fryer. IT'S A BREAD MACHINE!

Very shocked, I was really shocked! I started to look around and saw this note that was written by my Prince Charming. It goes: "

Dear,

Surprise! Early Christmas Present for you!
Hope you like it! Merry Christmas~!

Love,
Your Prince Charming

I was so touched! I called my Prince Charming immediately and he confessed that he run all the way to Carrefour and got it back home before I reached home so that he could give me a good surprise. I love you my darling :)

Thus, I couldn't wait to use my newly bought Bread Machine. Decided to try out with Carrot loaf because it is very easy and I have tonnes of carrots at home and there is a desire need to clear them before they starts to rot. The bread came out nice at 2am. I was truly tired after that.

I sliced the bread up for our breakfast today and oh my, the bread is gorgeously nice and fluffy. We ate almost half a loaf! It's such a wonderful thing to own a Bread machine! It's so hassle free!

Thursday, December 06, 2007

Wholemeal Raisin Bun


Makes 12 buns

IngredientsAmounts
Bread flour320g
Wholemeal flour50g
Salt2 Tsp
Instant dry yeast2 1/2 Tsp
Butter25g
Milk80g
Egg35g
Honey45g

Additional:

  • Raisins
  • Egg Wash
  1. Combine all the dry ingredients in a bowl. Add in egg, honey and milk and mix the combination on low speed.

  2. When a dough is formed, add in the butter and continue to hook at medium speed.

  3. Place the ready dough into a bowl and cover with plastic wrap. Allow a proofing of 60 mins.

  4. When proofed, punched out the air and allow the dough to rest for another 10 mins.

  5. Cut the dough into 6 small portions and flatten each indivdual dough.

  6. Roll the dough like a oval shape. Apply the raisins and coat a layer of egg wash. Roll the dough up like a swiss roll.

  7. Cut the roll into 2 and place it into a chiffon pan. Proceed to do the same for the rest of the dough.

  8. Coat the whole bread dough with another layer of egg wash and allow the 2nd proofing of 45 mins.

  9. Bring to bake at 190 degree Celsius for 30 mins.


I must confess that this was in fact a "testing" product. I was merely trying out my new wholemeal flour and thought of trying to do one wholemeal bread by myself.

All in my mind was to bake a raisin related bread because of the tonnes of raisins that I've stocked up recently. I couldn't figure out what's wrong with me that I did not take the initiative to refer any recipes from fellow baking bloggers or my recipe collections. I think I must be real sick. By the way, I'm on sick leave today and was getting bored at home, so I think the best way to keep me clear of everything is to start with my baking obsession

The ingredients above were merely based on "agaration". Like I mentioned, I did not have any reference thus, I just added in the ingredients by my 6th sense. LOL!

Anyway, I was relieved that the whole bread tasted nice. The outer layer was crispy and the inner was fluffy and soft :) It's a miracle I can say.

Monday, December 03, 2007

Raisins Sprial Roll & Oreo Butter Cake


Makes 8" Cake Pan

IngredientsAmounts
Cake flour225g
Baking powder1 Tsp
Baking soda1/2 Tsp
Salt1/2 Tsp
Butter85g
Sugar150g
Eggs, beaten2
Yogurt240ml
Vanilla Essence1 Tsp
Oreo cookies1 packet


  1. In a bowl, sift all the dry ingredients together.

  2. Cream the butter and sugar together. When well blended, add in the eggs slowly and ensure that the mixture is well mixed.

  3. Fold in 1/2 of the flour mixture into the butter mixture. Add in 1/2 of the yogurt and fold in another 1/2 of the remaining flour mixture. Add in the last amount of yogurt and Vanilla essence. Combine well and fold in the last amount of flour. Blend well.

  4. Take a portion of the oreo cookies and crushed them using a roller pin. Pour the crushed cookies into the batter and blend well. Pour the ready batter into the cake pan and garnish by placing a few of the whole Oreo cookies on top.

  5. Bring to bake at 180 degree Celsius for 35 ~ 40 mins.


Verdict from the Royal Prince Charming: Soft and nice!

My Prince Charming was amazed by the crispy skin of the cake and the fluffiness. He was just in time when I got this cake freshly out from the oven. He couldn't even wait and wanted to eat that right away. I stopped him of course, because my mum always remind me never to eat anything that is just cooked pipping hot because it is very heaty for the body. My Prince Charming has this bad habits of being impatient when it comes to food. :P

This recipe is adopted from Angie of My Kitchen, My Laboratory.
I missed her bloggings :'(


Makes 6 Spiral Raisin Buns

IngredientsAmounts
Cake flour250g
Icing sugar40g
Salt1/2 Tsp
Water90ml
Egg1
Instant Yeast1 1/2 Tsp
Butter40g


Additional:


  • Egg Wash
  • Raisins
  • Sugar
  1. Combine cake flour, icing sugar and salt together in a bowl.

  2. Add in water, egg and instant yeast and continue to mix into a dough.

  3. Once the dough is formed, add in the butter and blend into a smooth and shiny dough.

  4. Place the dough in a bowl and cover with plastic wrap. Allow proofing of 60 mins or when double in bulk.

  5. Punch the air out and knead the dough. Cut the dough into small portions. Roll each portions into oval shape.

  6. Brush the oval shaped dough with egg wash and spread the raisins on top. Sprinkle some sugars and roll up like a swiss roll.

  7. Make a cut in the center of the rolled dough and open it up to form the spiral shape.

  8. Brush the dough with some egg wash and sprinkle some more sugar on top.

  9. Allow the dough to proof for another 45 mins.

  10. Bring to bake at 180 degree Celsius for 20 mins.


Strange enough, no cinnamons or nutmeg were added to this bread. However, my Royal Prince Charming commented that he could taste a tint of either one of the spice in the bread >.<

I was inspired by Lee Lee's Mocking sting bees Bread, thus decided to try a hand on it.
Anyway, I did some modifications to the shape of the bread and omitted the milk powder. I prefer something petite and cute :)

*Updates: I gobbled these breads this morning and realised that the skin of the bread can get hard if it's left overnight but amazing part is, its more to the crispy kind of hardness and the inside of the bread is still soft and chewy. I will definitely try this again :D*

Saturday, December 01, 2007

Sausage Rib Bread


Makes 1 loaf

IngredientsAmounts
Bread Flour200g
Cake Flour40g
Sugar35g
Salt¼ Tsp
Instant dry yeast2g
Cold Water70g
Mashed Potatoes30g
Butter15g

Fillings: Jumbo Chicken Sausage from Carrefour
Brushing: Beaten egg and Ketchup

  1. Combine the flour, salt, sugar, yeast, potatoes and water in a bowl. With the help of a mixer, hook the mixture on low speed. When a dough is formed, turbo the speed to Medium and continue hooking till dough is smooth and shiny.

  2. Add in the butter and adjust the speed to slow. When butter is combined with the dough, turn it back to Medium speed once again. You should get a smooth dough.

  3. Allow the dough to proof for 80 mins.

  4. Once proofed, punch out the air within the dough and let rest for another 10 mins.

  5. Cut the dough into 4 equal portions. Roll the individual portion into an oval shape. Place the hotdog on top of the dough and start to roll the dough up. The hotdog should be covered by the dough.

  6. Cut the wrapped dough into small slice and twist to form the rib-like shape. Allow another proofing of 25 mins.

  7. Once ready, brush the top with some beaten egg and ketchup. This will add shine and an additional flavour to the ready result.

  8. Bring to bake at 180 degree Celsius for 18 mins.


These Sausage Rib breads were supper for my Royal Prince Charming. He was yearning for supper at 10+pm and I got that sixth intuition that he's gonna cook a bowl of Instant noodles. I don't like the idea that he is taking MSG product at such hour, because firstly, MSG is no good for health and the salt content is far too high. Secondly, Prince charming always love to add in many "side ingredients" into his noodles. For example, he can add up to 4-5 items for his noodles and they can range from Luncheon meat to Dice chicken and he's complaining that he is putting on too much weight.

Anyway, I was planning to bake some bread for breakfast tomorrow so it became a killing 2 birds with one stone plan. I get breakfast done and a healthier supper for my Prince Charming.
Flipped through my recipe book and found this. It's so far the shortest time required recipe that I've come across. I need to get the bread done before my Prince Charming comes nagging at me again. Nag for food as usual. LOL.

By the way, I did some really really big mistakes. I think I'm just too tired. The recipe actually required an egg yolk for the dough but I forgotten to add it, also it was supposed to proof for 80 mins but I forgotten all about it when my timer alerts me when it's 60 mins. Thus, the dough was only proofed for 60 + 25 mins instead of the 80 + 25 mins. What's going on! I think I can't really do too many things at the same period of time.

I was helping out my Prince charming with our newly bought Christmas tree. Next, I was hanging the clothes, and next I was washing up the dishes and next I was vacuuming the floor and next I was cleaning the kitchen and next I proofed my dough for only 60 mins!!! What's going on! I guess, I can't really multi-task. Tsk tsk.

Wednesday, November 28, 2007

Seaweed Pork Floss Loaf


Makes 1 loaf

IngredientsAmounts
Bread Flour200g
Salt¼ Tsp
Sugar10g
Plain Yogurt35g
Instant dry yeast2g
Water80g
Butter15g

Filling: Seaweed Pork Floss

  1. In a bowl, combine all the ingredients together exception of the butter. With the help of a mixer, hook the mixture using low speed. When dough is formed, change the speed to medium.

  2. When the dough is no longer lumpy, add in the butter and continuing hooking. As step 1, hook using low speed and changed to medium speed when dough is smooth and shiny. Hooking should takes about 20-30 mins, depending on individual mixer force and speed.

  3. When dough is finally ready, allow to proof for 80 mins. Remember to place the dough in another bowl and cover with plastic wrap.

  4. When the dough has proofed, it should increase double in size. Roll the dough into a big round ball and allow it to rest for another 15 mins.

  5. Next, roll the dough into a rectangular shape. Apply the seaweed pork floss onto the dough evenly. Once done, roll up the dough like the way a swissroll does. Allow the dough to go through another round of proofing for 60 mins.

  6. Coat the dough with beaten egg and bring to bake at 180 degree Celsius for 30 mins.


I have always like the Pork floss buns that can be found in many of the bakeries. However, whenever I recall the amount of butter or mayonnaise that is being applied to it, I got this feeling that a big pile of weight just got clinged onto me. Being a very "bready" person, I can go on 3 meals with just bread, jam and peanut butter. I can even choose bread over a sumptuous meal and my parents could never understand why. Well, neither do I :P

Was flipping through my bread recipe "孟老師的100道麵包" as usual and saw this Pork Floss recipe. Browse through the ingredients and realised that very little or in fact, you can replace the butter with healthier choice like Canola or Olive Oil. It's less fattening, I assume.

The result was good except for the part that I could have done better was the rolling procedure. I guessed if I were to roll the dough tighter, then some part of the bread would not have come loose when I sliced down. Nevertheless, I will nominate this bread to be my every weekend breakfast! It's fast and tasty and soft and fluffy! I'm running out of descriptions but I'm sure you guys will love it! Bon appetit!

Oh, by the way, my seaweed pork floss flew all the way from Taiwan! A complimentary from my Mother in law! LOL! It's surely taste much better than the pork floss we get here.


Tuesday, November 27, 2007

Yogurt 波羅 Bread


21.7 X 9.4 X 77 Pullman Tin

IngredientsAmounts
Bread Flour250g
Salt¼ Tsp
Sugar35g
Plain Yogurt80g
Instant dry yeast3g
Water80g
Butter20g

波羅 Skin

IngredientsAmounts
Butter40g
Icing sugar30g
Beaten egg15g
Cake flour55g

  1. With the help of an electrical mixer, combine yogurt, water, salt, sugar, bread flour and instanst dry yeast.
    Mix the mixture on low speed and when dough is formed, switch to hooking the dough on medium speed.

  2. When the dough is smooth, add in the butter and continuing hooking. As step 1, hook using low speed and changed to medium speed when dough is smooth and shiny. Hooking should takes about 20-30 mins, depending on indiviudal mixer force and speed.

  3. When dough is finally ready, allow to proof for 80 mins. Remember to place the dough in another bowl and cover with plastic wrap.

  4. While waiting for the dough to proof, we may start on the 波羅 skin procedures. In another bowl, combine cake flour, egg, icing sugar and butter. Whisk till mixture is light and fluffy. You may fridge the 波羅 batter for later usage.

  5. After the dough has finished with the proofing, the size should double in size. Punch out the air that lies within the dough and knead gently. Allow the dough to rest for 15 mins and then proceed for the 2nd proofng of 60 mins.

  6. When the dough has finally rise from the 2nd proofing, flatten the dough with a roller-pin and roll up the dough like a swiss roll. Put the swiss-rolled dough into the pullman tin.

  7. Obtain the 波羅 skin from the fridge and spread it onto a plastic wrap. The plastic wrap should be the of the same length and width as the pullman tin. Move the plastic wrap that is covered with 波羅 skin over to the dough and stick it onto the top of the dough. Remove the wrap carefully.

  8. Bring to bake at 180 degree Celsius for 30-35 mins.


I had a much bigger pullman tin and thus, my dough could not reached the top even after all the proofing :(
Well, guessed I have to buy a smaller pullman tin. Anyway, I love this bread because the 波羅 skin makes the whole loaf taste so savoury! It can be eaten plain because the 波羅 skin is sweet and crispy and it makes the whole loaf taste heavenly.

By the way, this recipe came from the book "孟老師的100道麵包". The original recipe call for Unsalted butter, but I switched it to salted one instead because graciously me forgotten to top up the stock. Also, I've omitted the 10g milk powder which is for the 波羅 skin. The recipe also asked to bake this dough at 200 degree Celsius but I realised that it looks kind of hot for my dough, as I realised that the sides were dark, therefore I lowered it down to 180 degree Celsius.

My Royal Prince Charming was engrossing himself with his new RPG game and when I gave him one to sample, he immediately ran out of the room for more. He always has a liking for 波羅包. It's no wonder that he could actually gave up his game for this loaf of bread.

The whole loaf was almost finished this morning. Royal Prince Charming requested for a bigger slice so that he gets to taste more of the 波羅 skin and for me, I actually gobbled down 3 slices of it. I believe my Royal Prince Charming will finished the whole loaf today while I'm at my yoga class. *Giggling*