Monday, October 29, 2007

Butter Cream Cupcakes


Makes 12 Cupcakes

IngredientsAmounts
Self-Raising Flour175g
Sugar150g
Eggs3
Butter (soften)150g
Vanilla Essence1 Tsp
  1. Preheat oven to 180 degree Celsius

  2. Line the cupcake pan with cupcake cups.

  3. Crack the eggs into a bowl and beat lightly with a fork.

  4. Place all the ingredients into a bowl and mix till combination is light and fluffy.

  5. Divide the batter into 12 portions.

  6. Bring to bake for 18mins at 180 degree Celsius.


Butter creme for 12 cupcakes

IngredientsAmounts
Icing Sugar150g
Butter150g
Vanilla Essence1 Tsp
Hot water2 Tsp
  1. Beat butter and sugar together.

  2. When mixture is well combined, stir in Vanilla essence and hot water. Beat till mixture is smooth and creamy.


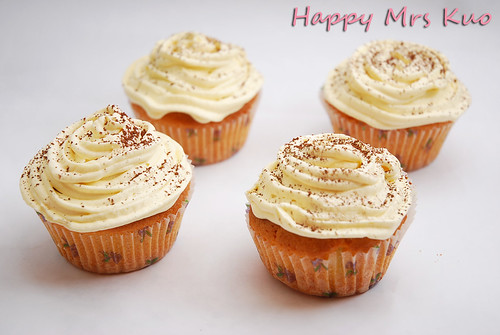
Got this sudden craving to bake some cupcakes for my colleagues. Remember the last time I had a cupcake was like million years ago! Anyway, I think there's a serious need to practise my frosting :(

The cupcakes looked disastrous with my frosting *Cry out loud*
I hope my colleagues wouldn't mind.

Sunday, October 28, 2007

Chiffon Cake


Makes 20cm Cake

IngredientsAmounts
Plain Flour150g
Baking Powder1Tsp
Sugar100g +90g
EggYolks4
EggWhites4
Cream of Tar Tar1/8 Tsp
Coconut Milk70ml
Water45ml
Vegetable Oil70ml
Salt1/8 Tsp


  1. Preheat oven for 15 mins at 180 degree Clesius.

  2. In a mixing bowl, combine egg yolks, 100g sugar and vegetable oil.

  3. Add in the dry ingredients like sifted flour and baking powder, followed by coconut milk, salt and water.

  4. Mix the combination evenly till you see a smooth mixture.

  5. Using an electrical mixer, whisk the egg whites till soft peaks are formed. Add in the remaining sugar and Cream of tar tar. Stop when mixture become stift.

  6. Combine the 2 mixtures together. Pour them into a chiffon cake pan.

  7. Bring to bake at 170 degree Celsius for 35 mins.


* As I only owned a 16cm chiffon cake pan, therefore I had the remaining batter poured into my cupcake cups! They looked kinda weird but its another way of saving my food :) *


My royal prince charming requested for Chiffon cake and so I decided to bake him one. The plan was to bake a Pandan flavoured cake, you know like the ones you see commonly in NTUC and cold storage. However, with no pandan essence and leaves at home, I got to change the plan to baking a basic flavoured one instead.

I got a shocked when I realised that the cake mould I used, was kind of hard to remove :( Was drenched with cold sweat while trying to remove my cake from the mould. Luckily, only some of the sides were slightly chipped off. I was so afraid that my whole cake might just go into waste if the cake mould wouldn't cooperate! Nevertheless, it makes my royal prince charming a happy man today. He like the cake so much! It makes me a happy wife because my man is happy! Hee~


Saturday, October 27, 2007

Secret

Follow the notes upon the journey

At first sight marks one's destiny

Once the voyage comes to an end

Return lies within hasty steps

Monday, October 22, 2007

Mini Marco Studio

I received a couple of emails and questions from friends and visitors and even my favourite blogger, Happy Home Baking about the cookies shot. The shots were indeed way much better than the usual ones I took .

So, what's the secret behind these shots? The secret is, I was given a mini Marco studio! Amazing? Frankly speaking, I was amazed by it, the 1st time I saw it, which was like 1 year ago. That's not very shocking to me now because I get to see it everyday. LOL!

I was kind of disappointed with the pictures I took for my foodies and my Photography Guru a.k.a. my Royal Prince Charming a.k.a my hubby decided to make me a Mini Marco studio. I could see that he's not very satisfied with my pictures because I know that my pictures either looked soulless or they looked horrible.

We went to Popular Bookstore and gotten a row of Tracing paper, squeeze into our store room and came out with a big carton box. Hubby D-I-Y the studio box within minutes and I was beaming with joy, although the living room looked disastrous after all the cuttings and tappings. Next, he started to photoshoot the freshly baked Cornflake Cookies. I did the arranging of the cookies :) Tadah, the shots were out! I heart them!!! I think they looked professional! Don't you think so? =X

Credits mainly goes to my Prince Charming! I love you darling! *Muacks*

Sunday, October 21, 2007

Cornflake Cookies


Makes 40cookies

IngredientsAmounts
All-PurposeFlour300g
Salt1 tint
Butter225g
Sugar125g
Egg1/2
Corn flakes1 packet


  1. Preheat oven to 180 degree Clesius

  2. Sift All-Purpose flour and salt together in a bowl.

  3. Crush the cornflakes using a roller pin.

  4. Cream butter and sugar together with the help of a electrical mixer. When mixture turns pale, add in the egg and mix well.

  5. Add in the flour mixture and mix well till a soft pastry dough is form.

  6. Pour the crushed cornflakes into the dough mixture and blend well.

  7. On the bakying tray, place a sheet of greaseproof paper. Roll 1 small ball of the dough and place it on the tray. Flatten the dough ball using ur hands.

  8. Bake for 15 mins at 170 degree Celsius or until cookies turn golden brown.


The cookies came out nice :)


The rumblings of the Cornflake cookies

I had this big packet of non-sweet cornflakes left in the fridge. The cornflakes were supposed to be my breakfast for last week but apparently, my sweet tooth just doesn't like the plain taste. I've been wasting some of my overdue food recently and everytime when I think about it, I felt so guilty because knowing that there are so many misfortunate people out there who ain't had enough food and here I am throwing my food away. So, I decided to treasure every bits and pieces of my food and here comes the Cornflake cookies. This recipe was found in my super old Home Ecomonics book 10 odd years ago. It is very crunchy and nice! Give it a try :)